The Tools
Understanding the module editor
Introduction
Building a module is a creative process. Anyone can do it, providing that the goals for creating a module are outlined clearly by analyzing the problem that needs to be solved and gaining a basic understanding of the tools available within the software. The most common obstacle that most people have is a lack of self-confidence. The best approach is to wipe away your preconceived notions about programming. It can be fun, and you don’t need to be a programmer or mathematician to create a module. Building module is similar to building with legos or composing sentences.
This manual is divided into three parts: a module editor overview that illustrates where its functions and features are located, a module cookbook with useful recipes and blueprints for building modules, and finally an appendix that will supply you with general knowledge about the Python programming language.
Throughout the manual you’ll find tips and warnings displayed with a color background to help you avoid common, time consuming traps. There are also useful script memos for seasoned module programmers. If you are new to scripts, don’t pay attention to these at first read, it will mean more to you once you reach part 2 of the module cookbook.
Now let’s begin by having quick look at the Modul8 module interface:
Module editing window
To access the module editor window go to the Modules menu and then select “Editor” or use the keyboard shortcut (⌘ ⌥ E).
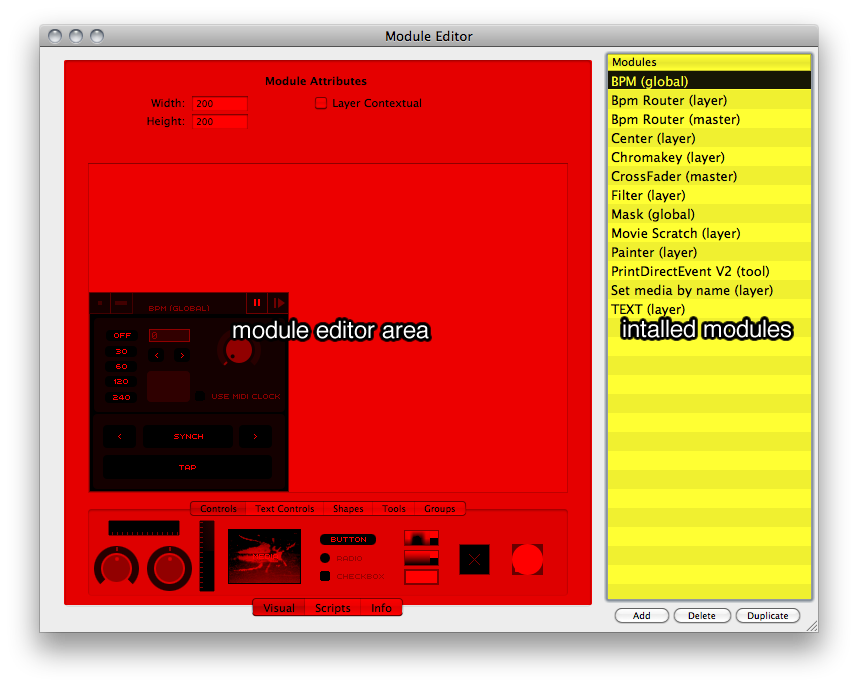
The module Editor Window is divided into 2 areas - the editor area on the left and the installed modules list on the right.
Every module downloaded from the online library or created in the module editor is stored in a folder named “Modules” located inside your Modul8 application folder.

You might want to hide a module from your module list. In my module library I have a lots of modules. Some of them are seldom used, some are only used as a framework for sample code to create new modules and others are only developed for a specific project or show. If you want to manage your modules, a simple solution is to create a subfolder in your modules folder. Modul8 only loads modules located at the root level of the Modules Folder.
For instance, I have 3 sub folders: "unused modules”, "tutorial" and "beta version”. When I am working on a module I will put the work in progress inside the "beta version" folder so that I can prevent possible bugs from interfering with my performances.
The Editor Area is divided into 3 spaces:
- Visual: the module User Interface builder area. There you will set up the visual interface of your module and add controls and decorations to make your module user friendly.
- Scripts: the program editor of your module. You can create a module entirely made of scripts.
- Info: information about your module.

If your module does not include any user-interface, it’s a good idea to add a visual description using the text controls caption tool, to explain what your module is supposed to do.
Visual
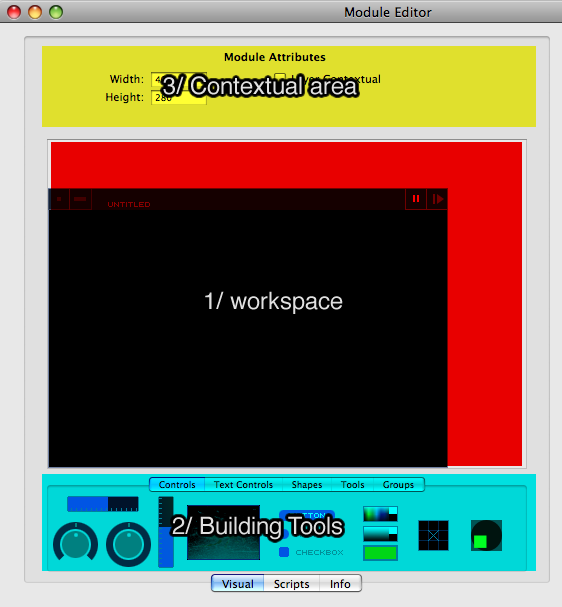
The Visual space is distributed into Three Areas.
Workspace: located in the center of the editor
- Controls
- Text Controls
- Shapes to add design elements and decoration for better readability
- Tools to set and define the hierarchy of a module visual interface
- Groups property tool
Building Tools: there are 5 types of tools to build and manage the visual interface
A Contextual Properties area. This space is contextual to the current selection. The default contextual view is the Module Attributes.
Contextual Panel
Attributes
When you create a module and add a visual element to it, you create a new instance of an object. Each object - be it a knob, slider or button - has attributes. Attributes are properties that define how each of the these controls function.
Module Attributes are displayed contextually, that is, depending on what object you select to edit, the module will display its attributes. By default, when you create a new module, the attribute displayed will allow you to set the width and height of the module, and the control type, whether it is for controlling a currently selected layer (contextual) or master (general non-layer specific functions). For instance, it is possible to create two modules with the exact same functions but one uses a horizontal layout and the other a vertical layout.
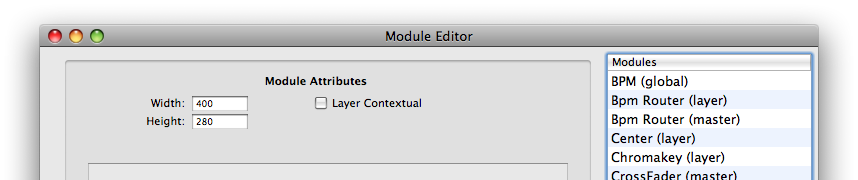
If you plan to share a module, it is important to take into account that other users might have smaller screen resolutions than yours. Try to create reasonable sized modules. The default size is set to 400 px and 280 px. The following pixel sizes can serve as a reference for how much space is available on a typical laptop screen: Main interface: 704 x 746 pixels
Media set window: 320 x 266 pixels
Space used when you reset location windows: 1024 x 746 pixels
The native screen resolution of a 13.3’’ macbook: 1280x800 pixels
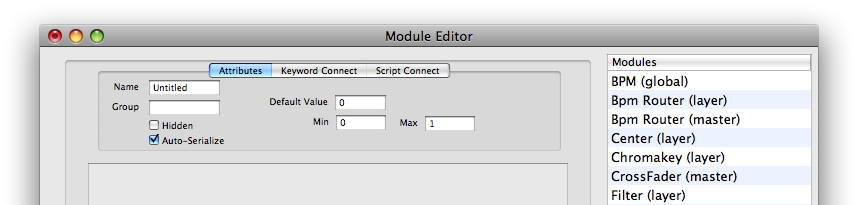
When you create or select an instance of a control or shape from the “Visual” tab, a contextual tab will appear in the contextual area. Every visual element has a name, a Group name, Hidden property, and Auto-Serialize property. Other properties are related to the control or elements unique properties. For instance, when selecting a rectangle shape, the attributes displayed will allow you to adjust the rounding of its corners, whereas a button has no such option.
More information about common attributes:
Name: when you want to order an action or ”talk” to a specific visual element you need to name the element you are talking to. It is similar to a director who wants to call out to a specific actor standing in a crowd, he has to call the actor by his real name: ”Hey Bob!” or by a visual attribute: ”Hey you with the red leather jacket!” otherwise no one from the crowd will take notice. Similarly, when building a module, you need to name an element when you want to retrieve or set values or change an element’s visual properties.
Group: the group attribute is useful when you want to hide or show a bunch of items in your module. You can do this with a script or by using the “show” or “hide” button from the “Groups” building tools tab.
Keyword Connect
Scripts control Modul8 using keywords to control layers, the master interface and more. Nevertheless it is not absolutely necessary to have programing skills in order to create interactivity between a module and modul8. “Keyword Connect” is a simple way to create a bridge between visual controls and the modul8 general interface. With the “Keyword Connect” you can build powerful modules without writing a single line of code. (See Cookbook chapter for fast recipes).

Only Controls from the building tool’s "Controls" tab, numeric field and text field controls from the building tool’s "Text Controls" have a “Keyword Connect” ability.
“Text Caption”, “Free Text Caption”, “Shapes” and “Draw View” can’t be used with the ”Keyword Connect” function.
Script Connect
If a script you have written requires the interaction of controls, it will be necessary for the control to communicate with the script. Using the ”Script Connect” tab you will be able to specify a message for the control to send to the script. (See: Cookbook Recipes basics)

Now that you are familiar with the main zones of the editor, let’s get into what is really exciting about modules: controls.
Controls
There are 5 types of controls in the Building tools “Controls”:
Range controls: sliders, knobs, pad
Switch controls: push buttons, radio buttons, checkbox
Media preview
Color pickers: color picker, grey picker, color swatch picker
Custom view/Draw view

Each control has a default size, but you can resize most of them to suit your interface design.
Visual feedback is displayed in orange to monitor the width and height of a module.
Let’s have a closer look at those controls:
Range controls
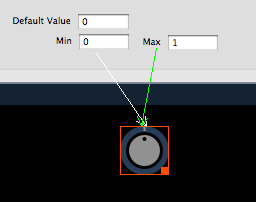
This family of controls (sliders, knobs, pad) have in common the ability to return a value (a floating point number such as 0.25) within a range of values defined by limits. Those limits are set in the “Attributes” tab.
- “Default value” field sets the initial value when the module starts or restarts
- “Min value” field defines the Minimum value range
- “Max value” field defines the Maximum value range

Sliders
There are two kinds of sliders, a horizontal one and a vertical one.
A slider returns a floating point number value from a range defined by a minimum value and a maximum value. The “Min” and “Max” value correlates to its visual representation.

Sliders Attributes
Min and Max range numbers are defined inside the “Attributes” tab window. By default the range is between 0 and 1. The default value is sent and displayed when you start or restart the module (unless you change this value within a script).
Default range is set between 0 and 1 because a majority of Modul8 keywords respond to values between 0.000 and 1.000. for instance the Z rotation knob in the Modul8 interface goes from 0 to 1 even if we are dealing with a 360° angle rotation.
If you want to monitor values returned by Modul8 you can download and use the Direct Event Viewer (tool) module from the GarageCube Library. Check the Modul8 Keyword checkbox, adjust the controls in Modul8 interface and look at the values returned.
You can change the Min and Max values and Default value. The Default value must be between the Min and Max value range. You can even enter negative values for any of the Min, Max or Default values.
The following figures show different range configurations. Since the Min and Max are correlated to the visual representation of the slider, it is possible to have a Minimum value higher than the Maximum value.
The great benefit of being able to customize the values of the sliders is that you can change the visual representation of existing parts of the Modul8 interface to suit your needs. For example, in the main Modul8 interface, the A/B crossfader slider displays group A when it is all the way to the left and B when it is all the way to the right. You could instead create a slider that inverts this visual representation so that when the slider in your module is positioned to the right that group A is displayed. This can be very useful in situations when you have a particular piece of hardware where you want to more closely match the paradigm between the hardware and Modul8.
See fig. 2.


The value change will be processed only when you validate your input. To validate an input, just hit the return key or change the field focus with the tab key or by a click inside of a different field.
To get/read a slider control value: module.getValue('sliderName', 0)
To set/write the slider value/position: module.setValue('sliderName', 0, value)
Parameters sent by the Send Message: {'NAME': 'sliderName', 'value': value}
Knobs
There are two kinds of knobs: a rotary knob and an endless knob.
Unlike slider range controls, knobs will look different depending on their scale.
The minimum size of a knob is 16 x 16 pixels. From 16 x 16 px to 33 x 33 px, knobs are simple plain disks.
From 34x34 px and above, knobs are displayed inside a blue circle.

Knob Attributes
Knobs, like sliders, are range controls. They output floating point numbers given a range of numbers defined by the “Min” and “Max” value fields. ”Default Value” defines the initial state or initial position of the knob at startup or when you restart the module. “Default Value”, “Min” and “Max” are defined within the “Attributes” tab (see fig. 1).
The rotary knob has visible limits for the “Min” and “Max” values.

The endless knob has no boundaries. If you tweak the knob to the right, the value jumps from Max to Min when the knob indicator is almost vertical.
To get/read a knob control value: module.getValue('knobName', 0)
To set/write the knob value/position: module.setValue('knobName', 0, value)
Parameters sent by the Send Message: {'NAME': 'knobName', 'value': value}
Keyword connect map
In the ”Keyword Connect” tab you can map the current value to Modul8 keywords (see Cookbook R.3).
Pad
The pad control is a 2D grid representation controller. The pad control allows the user to specify two values, the X and Y on a 2D grid. The X and Y values are modified when you drag your mouse over the pad. A cross will be displayed as your pointer. Typically the pad can be used to move a layer or to edit two values simultaneously (the layer speed and layer scale, for instance).
Pad Attributes.
The X and Y values are defined by a range of numbers and a default value (displayed as “Value”) for each axis.
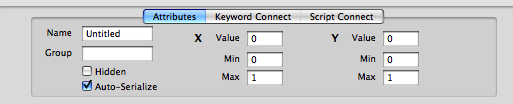
The origin of the X and Y coordinates is located on the bottom left corner of the pad. Don’t panic if you can’t see the cross when you add a new pad. The default initial value is almost hidden by the the pad grid because of its origin.

Pad script memo:
To get/read the X pad position: module.getValue('padName', 0) or module.getValue('padName', 'x')
To get/read the Y pad position: module.getValue('padName', 1) or module.getValue('padName', 'y')
To set the X pad position: module.setValue('padName', 0, value) or module.setValue('padName', 'x', value)
To set the Y pad position: module.setValue('padName', 1, value) or module.setValue('padName', 'y', value)
Parameters sent by the Send Message: two dictionaries will be sent in one message {'x': value, 'NAME': 'padName'} and {'y': value, 'NAME': 'padName'}
Keyword Connect map
In the “Keyword Connect” tab you can map the X or Y value to Modul8 keywords (see Cookbook R.3).
If you plan to use the pad to move a layer, notice that the default position of a layer is X:0 Y:0 and that the origin (x:0 , y:0) is located at the center of the grid or preview screen. The virtual size of the visible area on the preview grid window is Min: -320 , Max : 320 for the X axis and Min: -240, Max: 240 for the Y axis. But you can go beyond these limits. Your cursor will disappear on the preview grid window but not in the module grid pad).
The x and y position is not accessible with the “Pick in UI” button in the “Keyword connect” tab (see Cookbook recipe N°3). To bind the x and y position of a layer, open the keyword browser and select ctrl > layer > position > x or y, or simply add the keyword ctrl_layer_position_x or ctrl_layer_position_y in the ”Keyword Connect” "To:" field.
You can also modify the local origins of a layer. For example, by default when you rotate a layer it usually pivots around the center point of the media you assign to it. However, by using the keyword direct_layer_localPosition_x for the X position, direct_layer_localPosition_y for the local Y position and direct_layer_localPosition_z for the Z position, you can offset the center point of the media within the layer. The result would be that if you have a simple square it will now move in a circular motion around the axis point you specify, and not its own center point.
Switch Controls
This family of controls (push buttons, radio buttons, checkbox) is the only one that:
- Has static multiple attribute states depending on mouse click state over the control
- Combines an action and a text decoration (text caption) in one control
- Embeds an Excluding Group functionality (“Excl. Group” field ) to get a unique choice from a multiple choice items group
- Enables a visual toggle feature to switch values from one state to another (for instance ON/OFF)
The “Down” / “Continuous” / “Up” states are linked to the state of the mouse when it is clicked.
- Down value is sent once each time the control is pressed
- Continuous value is sent continuously over time until you release it.
- Up value is sent once each time the control is released.
These values can be retrieved within the param['value'] in the Scripts MessageEvent block
(see Cookbook 2.1).
- Selected checkbox defines the visual property of your control and works only in toggle mode or within an excluding group.
- Continuous checkbox switches the ON/OFF ability for a script to receive values defined in the “Continuous” field.
- Toggle checkbox sets the toggle mode for buttons and checkboxes (by default).
If you set up an “Excluding group” for a button or checkbox, the toggle checkbox state will be ignored. If you remove the “Excl. Group” name from a radio button, you can use the toggle feature (although this is not recommended)
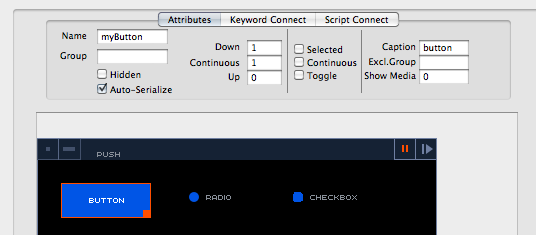
The selected property is the only property that you can read or write from a script. If you want to use a script to set your control to the “ON” selected state, use the following script: module.setValue('controlName', 0, 1) on fig. 10 controlName would be replaced by myButton. (More info in Cookbook 2.5)
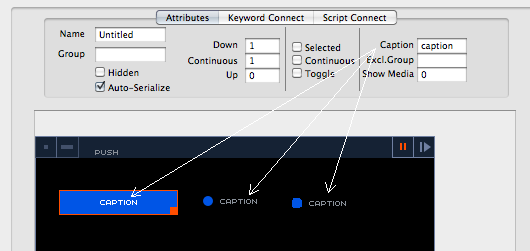
- Caption: this attribute sets the text decoration of your control. Depending on the type of switch control you use, the display will be different (fig. 11). Captions are always displayed in uppercase letters, most accents are displayed but we recommend you not use accent characters to ensure a correct display. This attribute can be retrieved or changed with a script line. Use the CAPTION attribute to change this feature (see recipe R.23). For instance in fig. 10, if you want to change the “BUTTON” caption into “RUN”, the script would look like module.setAttribute('myButton', 'CAPTION', 'run')
- Excl.Group: The ”Exclusion group” attribute allows you to group mutually exclusive controls , for example radio buttons. All switch controls in a module that have the same exclusion group name are mutually exclusive: when the user selects one, it deselects another one. If you want to have several groups of radio buttons, simply give a different exclusion name for each group. By default an ”Excl.Group” named “group 1” is set for each new radio button.
- Show Media allows you to transform your control into a “Media preview” control (see Media preview). 0 is the default setting for button, radio button or checkbox.
Keyword connect map
In the ”Keyword Connect” tab you can map the “Down” / “Up” and “Continuous” states to Modul8 keywords (see Cookbook R.3).
Push button
The main purpose of push buttons is to trigger an single action. By default it has 2 main values: 1 - when pressed, 0 - when released. Like other switch controls you can set the initial visual state of the button with the Selected checkbox only if you check the “Toggle” checkbox or create an excluding group, otherwise you won’t be able to display the selected button.
To get/read current value of a button: module.getValue('buttonName', 0)
To set the selected button to ON (toggle on): module.setValue('buttonName', 0, 1)
To read caption from a button: module.getAttribute('buttonName', 'CAPTION')
To write/change caption of a button: module.setAttribute('buttonName', 'CAPTION', 'text caption')
Parameters sent by Send Message: {'NAME': 'buttonName', 'value': value}
Notice that you cannot change the Toggle or Continuous mode with scripts. If you want to get one of these features you have to check the “Continuous” or “Toggle” checkbox manually.
Radio button
The main purpose of a radio button is to provide a list of options where only one of the radio buttons in one exclusion group can be switched on at a time. By default a radio button is bound to an exclusion group named “group 1”, meaning that if you add several radio buttons, they will all belong to the same group. You can change the name of the exclusion group if you want to make different option lists.
When you use a script to control an exclusion group list, you will receive two messages: the “Up” value of the control that is deselected and the “Down” value of the new selection.
Note that you cannot change the name of the exclusion group with scripts. You have to do it manually.
To get/read value from a radio button: module.getValue('radiobuttonName', 0)
To select a radio button: module.setValue('radiobuttonName', 0, 1)
To read caption from a radio button: module.getAttribute('radiobuttonName', 'CAPTION')
To write/change caption of a radio button: module.setAttribute('radiobuttonName', 'CAPTION', 'text caption')
Parameters sent by the Send Message: {'NAME': 'radiobuttonName', 'value': value}
Checkbox
The main purpose of a checkbox control is to switch an option ON or OFF. By default a checkbox button has its toggle mode enabled. This means that you can choose to select the ON or OFF mode by checking or not checking the “Selected” checkbox in the attribute window.
When you set the checkbox to ON and read checkbox control value, the “Down” value field will be retrieved.
When you set the checkbox to OFF and read the checkbox control value, the “Up” value field will be retrieved.
To get/read a checkbox value when it is OFF: module.getValue('checkboxName', 0)
To set a checkbox to ON: module.setValue('checkboxName', 0, 1)
To read caption from a radio button: module.getAttribute('checkboxName', 'CAPTION')
To write/change caption of a radio button: module.setAttribute('checkboxName', 'CAPTION', 'text caption')
Parameters sent by Send Message: {'NAME': 'checkboxName', 'value': value}
Media preview control
The media preview control works like a push button, though it has a specific feature: it can display one of the 128 media from the media set. Like a push button, you can get values when you press it. It as 3 values, one for each state: “Down”/”Continuous”/”Up”. Like a button, the media preview also has a caption that you can change with the caption attribute.
Show Media attribute sets up the media you want to display inside the control. By default the first media of the mediaset is displayed fig. 12. The “Show Media” attribute goes from 1 to 128 (see fig. 24).

The media preview won’t trigger media unless you connect the media preview control using “Keyword Connect” or write a script to bind it to specific media.

By clicking on the “i” button located in the upper left corner of the mediaset window, you can see the media ID number of the currently selected media. The number is displayed in the upper left corner of the information panel. This ID number is used by the script (see Tip #12). To display the media in your media preview control, just add 1 to the displayed ID. In fig. 25, the first media has “0” as its media ID. The “show media” attribute will be 0+1= 1. In fig. 26 the media ID shows 70, so the “show media” attribute will be 70+1= 71.


To get/read current value of a mediapreview: module.getValue('mediaPName', 0)
To display a media inside the mediapreview: module.setValue('mediaPName', 0, mediaindex)
To read caption from a mediapreview: module.getAttribute('mediaPName','CAPTION')
To write/change caption of a mediapreview: module.setAttribute('mediaPName', 'CAPTION', 'text caption')
Parameters sent by Send Message: {'NAME': 'mediaPName', 'value': value}
Beware! The show media attribute index starts at 1 and goes from 1 to 128 whereas the Modul8 media display keyword “ctrl_layer_media” used in scripts to trigger media begins at 0 and ends at 127.
Color picker control
This family of controls (color picker, grey picker and swatch color picker) have the ability to set color values. The color picker and grey picker have an embedded color selector and the swatch color picker uses the OS GUI color selector.
The only attributes you can manually set are common control attributes like control “Name”, “Hidden” and “Group” attributes. To use the color picker you will need to use “Keyword Connect” or a script.
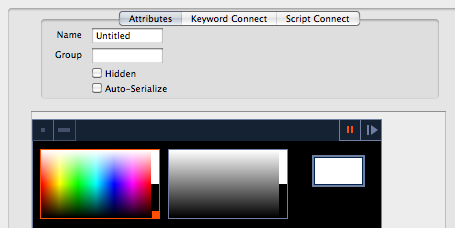
(Spectrum) Color picker
The spectrum color picker is used to select a color within a color range. Each color is a mixture of the three colors red, green and blue. The value of each of the three colors in the mix is a float number between 0.0000 and 1.0000.
Keyword Connect map
In the ”Keyword Connect” tab you can map the red, green or blue component value of the selected color to Modul8 keywords (see Cookbook R.3).
To get/read the red component of the selected color: module.getValue('pickerName', 0) or module.getValue('pickerName', 'red')
To get/read the green component of the selected color: module.getValue('pickerName', 1) or module.getValue('pickerName', 'green')
To get/read the blue component of the selected color: module.getValue('pickerName', 2) or module.getValue('pickerName', 'blue')
To set/write the red component of a color: module.setValue('pickerName', 0, value) or module.setValue('pickerName', 'red', value)
To set/write the green component of a color: module.setValue('pickerName', 1, value) or module.setValue('pickerName', 'green', value)
To set/write the blue component of a color: module.setValue('pickerName', 2, value) or module.setValue('pickerName', 'blue', value)
Parameters sent by the Send Message: 3 dictionaries will be sent in 3 independent message events, one for each color component:
{'NAME': 'pickerName', 'red': value}
{'green': value, 'NAME': 'pickerName'}
{'blue': value, 'NAME': 'pickerName'}
Grey picker
The Grey color picker is used to select a specific grey tone in a range from black to white. ,The grey color picker returns only one value. This value is between 0.0000 and 1.0000 , 0= black/darkness 1=white/lightness.
Keyword Connect map
In the “Keyword Connect” tab you can map the grey tone to Modul8 keywords (see Cookbook R.3). Since this control only returns one value it can be a good idea to use it as a single axis range control.
To get/read the light level value of the grey picker: module.getValue('pickerName', 0) or module.getValue('pickerName', 'level')
To set/write the light level value of the grey picker: module.setValue('pickerName', 0, value) or module.setValue('pickerName', 'level', value)
Parameters sent by Send Message: {'NAME': 'pickerName', 'level': value}
Swatch color picker
The swatch color picker works in combination of the OS GUI color selector. This means that once you press the control you have to pick a color through the external color picker. This feature is an opportunity to get any color from anything displayed in your interface and take advantage of the color mode selectors (color wheel, RGB slider, HSB slider, CMYK slider or color swatches) and favorite colors.
When you select a color the swatch color picker has a visual feedback. Each Color is made up of the sum of the three color components red, green and blue and the alpha/transparency value.
Transparency is displayed with a small grey square in the bottom left corner of the control (fig. 28) .

The value returned by each component is a float number between 0.0000 and 1.0000
Keyword Connect map
In the ”Keyword Connect” tab you can map the red, green or blue values of the selected color to Modul8 keywords
(see Cookbook R.3).
To get/read the red component of the selected color: module.getValue('pickerName', 0) or module.getValue('pickerName', 'red')
To get/read the green component of the selected color: module.getValue('pickerName', 1) or module.getValue('pickerName', 'green')
To get/read the blue component of the selected color: module.getValue('pickerName', 2) or module.getValue('pickerName', 'blue')
To get/read the opacity / alpha value of the selected color: module.getValue('pickerName', 3) or module.getValue('pickerName', 'alpha')
To set/write the red component of a color: module.setValue('pickerName', 0, value) or module.setValue('pickerName', 'red', value)
To set/write the green component of a color: module.setValue('pickerName', 1, value) or module.setValue('pickerName', 'green', value)
To set/write the blue component of a color: module.setValue('pickerName', 2, value) or module.setValue('pickerName', 'blue', value)
To set/write he opacity / alpha value of a color: module.setValue('pickerName', 3, value) or module.setValue('pickerName', 'alpha', value)
Parameters sent by “Send message”: four dictionaries will be sent in 4 different messages, one for each color component
{'NAME': 'pickerName', 'red': value}
{'green': value, 'NAME': 'pickerName'}
{'blue': value, 'NAME': 'pickerName'}
{'alpha': value, 'NAME': 'pickerName'}
Draw view / Custom view control
The Draw View is a special control. This control can be used to create dynamic animation, custom control and much more. For instance, the painter module uses this control to allow the user to paint, to display the brush and to send the drawings to the composition. The motion path uses this control to build and display complex motion paths.
While all the other controls are pretty simple, the draw view is more complicated and much more powerful. It is an area where your module can draw what it wants. It can also send the drawing into the composition as a static image, store frames over multiple internal layers and then send a specific frame to create pre-computed animation.
This control can also receive mouse input from the user such as mouse click and mouse drag. It is very useful when you want to build a custom control, like a button with a specific look.
Another exciting feature of this control is its ability to receive graphic tablet input messages like pen pressure, pen Tilt or pen rotation.
See recipe 34 for a complete review and functions of the draw view control.
Keys to read this memo: x = x position, y = y position, w = width , h = height, r = red, g = green, b = blue, a = alpha
- Outlined rectangle: module.frameRect ('viewName', x, y, w, h, r, g, b, a)
- Filled rectangle: module.paintRect('viewName', x, y, w, h, r, g, b, a)
- Outlined oval/circle: module.frameOval ('viewName', x, y, w, h, r, g, b, a)
- Filled oval/circle: module.paintOval('viewName', x, y, w, h, r, g, b, a)
- Line: module.drawLine('viewName', x1, y1, x2, y2, thickness, r, g, b, a)
To draw text: module.drawString('viewName', 'text string', x, y, r, g, b, a)
- Create bezier curve: module.bezierNew('viewName')
- Set the position of a point: module.bezierMoveTo('viewName', x, y)
- Add line from a point: module.bezierLineTo('viewName', x, y)
To set the bezier curve’s cap style:
- Rounded line-cap style display: module.bezierDraw('viewName', thickness, 'ROUNDLINE', r, g, b, a)
- Flat line-cap style display: module.bezierDraw('viewName', thickness, 'BUTTLINE', r, g, b, a)
- Square line-cap style display: module.bezierDraw('viewName', thickness, 'SQUARELINE', r, g, b, a)
Finish drawing/render and display: module.finishDrawings('viewName')
- Enter erase mode: module.enterEraseMode('viewName')
- Exit erase mode: module.exitEraseMode('viewName')
- Clear current view: module.clearDrawings('viewName')
- Create/set drawing layer: module.setDrawingLayer('viewName', 'drawingLayerName')
- To display the drawing content in a Modul8 layer: module.sendContentToLayer('view', 'caption', 0)
- Add current view to a new frame: module.addContentToFrameStack('viewName')
- Delete a specific frame: module.removeFrame('viewName', framenumber)
- Remove all frames: module.removeAllFrames('viewName')
- Display a specific frame to a Modul8 layer: module.senFrameToLayer('viewName', 'text string', layer,frame)
{'NAME': 'viewname', 'PRESSURE': value, 'ACTION':'MOUSEUP', 'Y': value, 'X': value, 'TILTX': value, 'TILTY': value, 'ROTATION': value}
The ACTION key can be 'MOUSEDOWN' , 'MOUSEUP' or 'MOUSEDRAGGED'
Text Controls
There are 3 types of controls in “Text Controls”:
- Text display: uppercase text caption, free text caption
- Input fields: text field, numeric field
- Text list
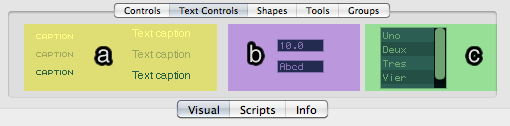
Text display
“Text Display” controls are special. Unlike other controls, you can’t interact with them manually. In other words, you cannot trigger any action when you click on them. These text fields only display text content. Nevertheless, it’s possible to manipulate their contents using scripts.
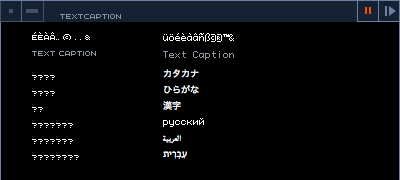
The main difference between the “Uppercase” text caption control and the “Free Text” control is the type of characters that they display.
The ”Uppercase” text caption can only display latin characters in upper case and some special characters, whereas the “Free text” caption can display both upper and lower case, all special characters and also some foreign languages (see fig. 30).
Attributes:
- Text: change the text content inside the “Attribute” text field.
- Align: align your caption either to the left, center or right.
To get/read text caption: module.getAttribute('captionName', 'CAPTION')
To set/write text caption: module.setAttribute('captionName', 'CAPTION', 'Text String')
Input field controls
There are two kinds of “Input” fields, a numeric input field control and a text input field control. These controls are useful when you want to display either numbers or text and be able to change values that interact with Modul8.
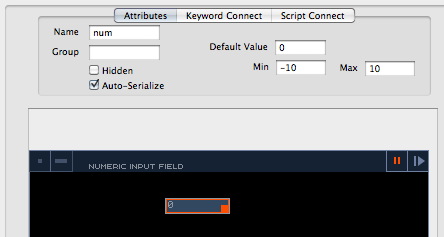
Numeric
The numeric field only accepts numbers. You can set a “Default” value, a “Min” input value and “Max” input value. When you enter a number beyond the minimum and maximum limits, the value accepted will be forced within the limits specified. You can enter negative limits such as “-20”. You can only set the Min and Max values manually.
The output value will be a floating number.
If you use a minimum value that is larger than the maximum value and enter a value beyond its limits, it will automatically correct the arithmetic comparison. For instance if Min = 40 and Max = -50 and you type in -100, the value will be changed to 40.
To get/read numeric field value: module.getValue('fieldName', 0)
To set/write numeric field value: module.setValue('fieldName', 0, 1)
Parameters sent by “Send Message”: {'NAME': 'fieldName', 'value': value}
Keyword Connect map
In the ”Keyword Connect” tab you can map the input value to Modul8 keywords (see Cookbook R.3).
Input field control - text input
The “Text input” field accepts any kind of character. You can enter either letters or numbers. Even if you enter numbers the output type will be a string of characters. In other words, if you type in 123, this number will be interpreted as a string “123” and not the number 123.0. The text input field can be a single or multiline text field.
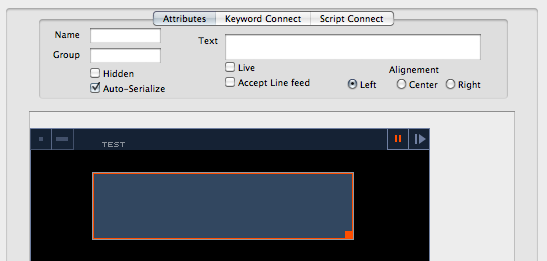
Attributes of the text input fields:
- Text is the default input text for your text input field.
- Live: when the live checkbox is on, the “Send message” event you created will be sent each time the content of the input field is modified.
- Accept Line feed: when this attribute is checked, a new line will be added to your input field each time you hit the return key. This is useful if you plan to display multiline text on screen. When this attribute is not checked if you hit the return key, the message event will be sent and you will lose the focus of your input field.
- Alignement: this aligns text within the text field.
In the attribute “Default Text” input field, if you want to insert more than one line for the default press ⌥ ⏎ key to add a new line.
Keyword Connect map
In the ”Keyword Connect” tab you can map the text value to Modul8 keywords (see Cookbook R.3).
To get/read text from the text input field: module.getValue('fieldName', 0)
To set/write text from the text input field: module.setValue('fieldName', 0, 'text')
Parameters sent by “Send Message”: {'NAME': 'fieldName', 'text': value}
List control
The text list control can store a custom list of values or a font list. A list is very useful for storing texts that will be displayed by a module, Modul8 keywords or names of presets. For instance, the BPM router uses a list to store keywords you pick from the user interface.
Attributes:
By default you start up with an empty list. You can decide to populate/add content to this list at startup or populate them later with scripts. You have two choices when you start a new list:
- Init With attribute field: you can enter a list of words or phrases. Use a comma “,” to add a new entry line to the list (see fig. 21: item1,item2 are displayed in list)
- Init With Font List will populate the list with the installed font list. Notice that those names are only references. You can’t change a font unless you connect the list to a script.
When you select an item from the list (custom or font name) you can send two kinds of values: a number index or text value.
Index (Abs or Pro)
A list is an enumerable object. When you start to count items from a list, you do it from top to bottom. Each item will be registered with a position defined by a type of number called an “index”. Every list index starts from 0.0. When you choose an index mode, it defines the way you will write a script to make a selection and get visual feedback.
- The “Abs. Index” or absolute index property. Absolute means that the index will be defined with absolute numbers (0, 1, 2, 3, 4…). For instance, in fig. 21, the index of “item2” is 1 (item1 --> index 0 , item2--> 1 etc.) and the index of “ACaslonPro-Italic” is 4.
- “Prop. index” or proportion index is another way to count items from a list. Proportion means fractions. How does it work? The list will be divided into fractions depending on the number of elements in your list. For instance, in fig. 21 the input list has three items (item1, item2, ...). Item1 will be 1/3 , item2 will be 2/3 and the last item will be 3/3 (last item/number of items). If item2 is selected, the value returned will be 2/3 --> 0.6666666666666.
This mode is useful for controlling a dynamic list with an external control. For instance, we previously saw that it was impossible to change the minimum and maximum values of a slider or knob with a script. With a dynamic list, the number of items will change, but the Min and Max range index from the list will remain the same (from 0.0 to 1.0). For a three items list : Min=0/3=0.0 Max=3/3=1.0 , for a 500 items list Min= 0/500=0.0 Max=500/500= 1.0) - “Text”: when you select this feature the text value of the selected item in the list will be used, meaning that the data entered will not be ordered in any particular way.

If you use a fraction as a number input, use floating points instead of integer numbers. For instance, don’t write 3/5 but 3.0/5 or 3/5.0 or 3.0/5.0, otherwise the float number will be misinterpreted by the list if you use the Prop.index mode.
To populate/write list: module.setAttribute('listName', 'TEXTLIST', mylist) or module.setAttribute('listName', 'TEXTLIST', ['item1', 'item2', 'item3'])
To get/read all items from a list: module.getAttribute('listName', 'TEXTLIST')
To get/read item at index: module.getAttribute('listName','TEXTLIST')[index]
To get/read number of items of the list: len(module.getAttribute('listName','TEXTLIST'))
To read/get value of the selected item: module.getValue('listName', 'selection')
To write/set value of the selected item: module.setValue('listName', 'selection', index)
Parameters sent by the “Send message”: {'NAME': 'fieldName', 'selection': value} selection value will depend on the selected mode - “Abs. index”, “Prop. index” or ”Text”.
Shapes
The ”Shapes” tab allows you to decorate your module. It allows you to include filled shapes and lines in your module. Filled shapes can be boxes or rectangles with rounded edges. The lines can be dashed (by default) or filled, both available in different colors. Once you choose a shape or line with its particular color you cannot change its appearance.
You can use color to set an “Action Zone”, a feedback area, provide focus to an important feature, etc.

You can modify the roundness of each corner of a filled shape individually (fig. 35).

I recommend you to create decorations once your module works perfectly. You will be able to set the visual hierarchy (depth, visibility) with tools from the “Tools” tab at the end of the module building process.
It’s also very handy to group all your decorations into a single group or into functionality groups (editorGroup, decorationGroup, backgroundGroup, etc). You will be able to hide or show them at will. But don’t forget to write down group names if you hide them. To do this you can add a comment in the ”Init” script block : #editor group --> editGroup
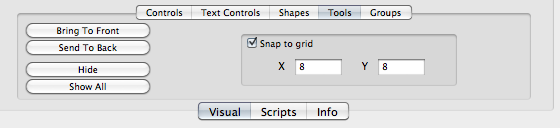
Tools
Tools are functions to arrange module position and visibility. Each time you create an instance of a control or shape, it will automatically be put on the top of the visual stack. Tools are there to manage the depth order.
- Bring To Front is a function that brings the selected visual element to the front. You can also select multiple controls or shapes to bring them to the front in one click.
- Send To Back is a function that sends the selected visual elements to the bottom of the stack. Use this function if you want to put a shape in the background. As with “Bring to front”, you can select more than one element and hit the “Send to back” button to send multiple elements at once.
- Hide is a button that hides selected element(s). It’s very useful when you work with several visual interfaces that are located in the same position. For a good example of this, the “Filter” module uses this feature in order to manage 4 different sets of filter controls.
- Show All: shows all controls and shapes meaning that all hidden elements will be displayed. Be careful, you cannot undo this function. So if you didn’t create groups it will be very difficult to hide them again if you work with a lot of elements at once.
A “Snap to grid” sub window is a global attribute preference for your module. When you check “Snap to grid”, each element will be snapped onto an invisible grid while dragging it. It’s very useful when you want to align visual elements. You can define the width and height property of the grid:
- X defines the width of the grid
- Y defines the height of the grid
You can’t set the depth of a control or shape with a script, you have to do it manually. But you can set up the control or shape position attribute with scripts.
list = [x,y,width,height]
To set the position and size of a visual element: module.setAttribute('visualElementName', 'FRAME', [x, y, width, height]) or module.setAttribute('visualElementName', 'FRAME', list)
To get position and size of a visual element: module.getAttribute('visualElementName', 'FRAME')
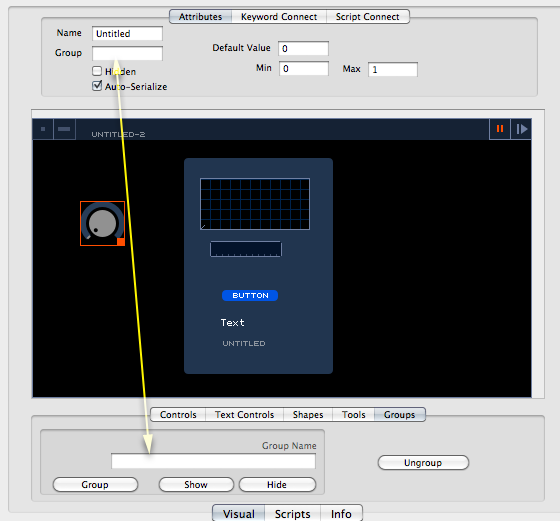
Groups
Groups are tools to group or ungroup visual elements. A name that is entered in the “Group” field in the “Attributes” tab will automatically appear in the “Group Name” field in the “Groups” tab (see fig. 37). You can select multiple controls or shapes and group them.
- The group button uses the “GroupName” text field as the current selection name
- Show button displays the group defined by the group name text field (if one exists).
- Hide button hides the group defined by the group name text field (if this one exists).
- Ungroup button ungroups selected elements.
Watch out: group names are case sensitive. For instance, “mygroup” is different from “myGroup” and Modul8 will interpret them as two different groups.
Scripts Tab
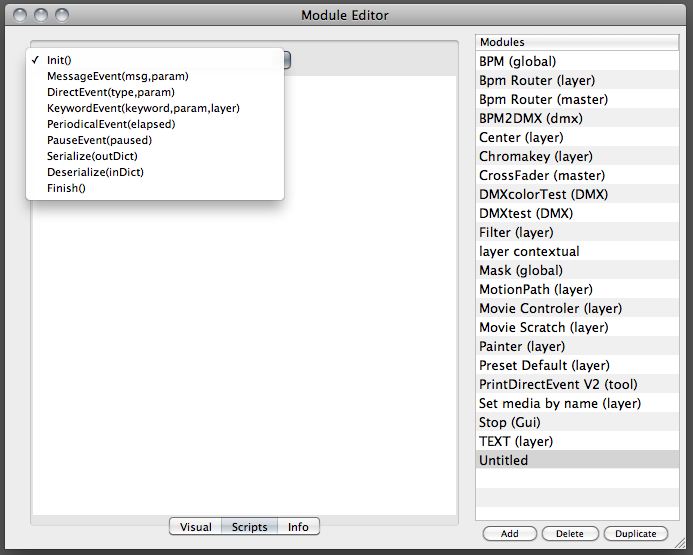
The ”Scripts” tab is an embedded script editor. The script editor is divided into script blocks that you can access with a drop down menu. The script default view is the “Init()” block. Each script block defines a part of a module process.
There are 9 types of script blocks:
- Init() is called each time the module is started/restarted
- MessageEvent(msg,param) is called each time a Message is sent by a control
- DirectEvent(type,param) is called each time you get a message from an external device (keyboard, midi)
- KeywordEvent(keyword,param,layer) is called each time a Modul8 keyword is triggered
- PeriodicalEvent(elapsed) is called periodically as long as the module runs (not stopped or paused)
- PauseEvent(paused) is called when you click on the pause button of the module
- Serialize(outDict) is called when you save a Modul8 project
- Deserialize(inDict) is called when a saved project is open
- Finish() is called when you quit Modul8 or when you stop or restart a module
Info Tab
When you share a module or get a module from the online module library, information about the module should be included The information will help Modul8 users know what your module is supposed to do and help them to choose the right module.
- Author: the name of the module creator or script modifier
- Version: version number of your module. This needs to be set manually. Modul8 won’t do the versioning for you.
- Short Description: the description displayed in the “Description” column
- Description: use this field to describe your module in detail. It can be used to display revision info in case a new version of the same module is made.

Modul8 Cookbook
How to build modules without scripts
The following recipes are easy to reproduce. You don’t need to have any programming skills.
1. How to create and save a module?
Open the module editor (⌘ ⌥ E)
Click the “Add” button, A new line will appear in the list.
Name your module: this will be the name displayed in the menu “Modules” > “Show”. This name will be used as a reference name for your module in the online public library if you plan to share it.
Save your module: go to “Modules” > “Save All Changes”, or use the shortcut ⌘ ⌥ S. If you forget to save your module, an alert window will ask you if you want to save modifications on modules when you quit Modul8. Once your module is saved, a file with .m8m extension is created inside your Modul8 application in the “Modules” subfolder (see fig. 0).
To arrange modules in your installed modules library list and also in the online library list, you can add a prefix to any module you create. I’ve been doing this for years and it’s very helpful. For example, my author name is VisionSonore so I start with “(vs)”. Other module creators do this and it’s very handy when you want to search and organize your modules. Other examples: sigma6 “(s6)”, Zoophar “(zr)”, Vaivendo “(vv)”, …
You can also add a suffix to your module if your module’s actions are made only for layers or the master interface. This is the case for the BPM Router modules - “Bpm Router (layer)” and “Bpm Router (master)”. One routes BPM to layer keywords, the other one to master keywords.
If your name is Bobby Brown and your module only works with layers, you can write “(bb) My module (layer)”.
2. Anatomy of the Keyword Connect panel
Most modules can be built without a single line of code.
The “Keyword Connect” panel (see fig. 39) next to the ”Attributes” tab can help you to connect almost every control to Modul8 keywords.
Modul8 keywords are script references used by Modul8 to tell it what to do or ask it what it is doing. When you select a layer, when you tweak a knob or a slider, you are sending messages, keywords and values associated to keywords without even knowing it. An existing module - the “Print direct event tool V2” - available from the online library - shows these keywords in action (see TIP #6). You can also get Modul8 keywords with the “Keywords” browser window (⌘ ⌥ B) (see fig. 57).

Only some controls can be connected with keywords with “Keyword Connect” (see Fig. 39): slider controls, knob controls, media preview control, buttons, radio button, checkbox, pad, numeric input field, text input field, text list and color picker controls.

The “Keyword Connect” panel is divided into three important zones (see fig. 41).

-
Connection Map preset list: every bindable control has ten map presets that allow you to connect up to ten Modul8 keywords to one action.
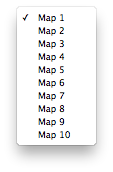
Figure 42. Map preset list. Don’t be mistaken! There is no direct link between layers and map presets.
Modul8 has ten map presets that give you the possibility to control up to ten features in one click.
For instance, these features could be either ten different actions bound to a single layer (for example, X rotation, Y rotation, Z rotation, scale, speed, movie position, red output, green output, blue output and alpha) or a single property like Z rotation to ten different layers (layer1, layer2, …, layer10). -
Bindable Action List: every bindable control has from one action (sliders, knobs, grey picker, input fields, list) to four actions (swatch color picker).
- Push button, media preview, radio button, checkbox --> up, continuous, down
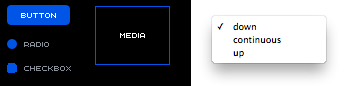
Figure 43. Bindable actions - switch and media controls. - Slider controls, knob controls, numeric input field controls --> value

Figure 44. Bindable action - range and numeric input field controls. - PAD control --> x, y

Figure 45. Bindable actions - PAD control. - Text list control --> selection

Figure 46. Bindable action - text list control. - Text input control --> text
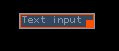
Figure 47. Bindable action - text input control. - Grey picker --> level
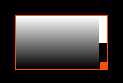
Figure 48. Bindable action - greyscale color picker control. - Color picker --> red, green, blue
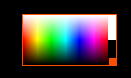
Figure 49. Bindable action - color picker control. - Color swatch picker --> red, green, blue, alpha

Figure 50. Bindable action - color swatch picker control.
- Push button, media preview, radio button, checkbox --> up, continuous, down
-
Keyword Connect action and destination area: this is where you set the Modul8 keyword and action target.
In this space you will set a keyword name.
You can either type the keyword name into the “To:” input field, or use the keyword picker button - “Pick in UI“ - to pick a keyword from a control in the Modul8 user interface, or select a keyword from the keyword library by clicking on the “browse...” button.Then with the “In:” list you will select the target of ”Keyword Connect” driven action.
Finally you will be able to control the value sent to the keyword. The expression field is a powerful feature that allows you to enter a mathematical expression that is applied to the value before it is sent to the keyword. By default it is set to “value=value”, meaning that the value is sent as is. For instance, if you want to get only the 10th of a value you can type "value=value/10".

Figure 51. Keyword Connect action and destination area.
Mathematical expressions are phrases you can read. For instance, “value=value/10” can be translated into a literal phrase such as: “the output value is equal to the current value divided by ten” or “the output value will be ten times smaller than the current size.”
Expressions also tell you how to perform calculations.
In math, some operators have priority over others. For instance, addition “+”and subtraction “-” have a lower priority than multiplication “*” or division “/”.
The mathematical phrase “5-3/2” will split this calculation into two simple calculations.
First it will calculate the higher priority operator, in this case the divide sign, so that the first calculation is 3/2 = 1.5.
The result will be subtracted from 5, so that the final result is 5 - 1.5 = 3.5. We can write the same phrase with brackets:
5-(3/2) = 3.5
Brackets in a mathematical expression force the values in the brackets to be calculated first. If you turn 5-3/2 into (5-3)/2 then (5-3) will be calculated first, then 2/2 = 1 resulting in (5-3)/2=1.
In the keyword expression input you can have different results depending on brackets. value=(value-5)/2 will be different from value=value-(5/2).
3. Connect a keyword to a layer - method 1
This recipe will show you how to change the opacity of a specific layer in group A with a knob control. For this to work you need to have an active layer in group A.
Select the knob control icon and drag it into your module.
Scale the knob to suit your needs.
-
Click on the button “Pick in UI”. You are now in “Keyword picker” mode. The current keyword is set to “NONE” in the “To:” input field in the keyword area , indicating that no keyword is connected yet.
-
Click on the layer of your choice to insert the opacity Modul8 keyword. You should have the text “ctrl_layer_alpha” in the “To:” keyword control input field.

Figure 52. Connect a keyword to a layer -method1 - step 4. -
Select the layer destination/target for this keyword. Layer 1 (first layer on top of groupA) is set as the default target. You can choose among ten different layers from the “In:” list.
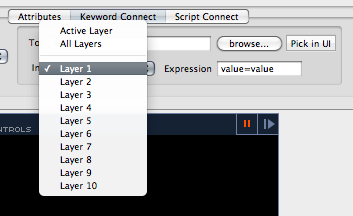
Figure 53. Connect a keyword to a layer -method1 - step 5 (select destination). 
Figure 54. Connect a keyword to a layer -method1 - step 5 (layer destination scheme). Restart the module to test it by going to “Modules” > “Restart” or use the shortcut ⌘ ⌥ R Then save your module: “Modules” > “Save all changes” or use the shortcut ⌘ ⌥ S.
Here’s a method for understanding the “Keyword Connect” process. You can create a phrase based on the visual interface elements: “For Preset (Map preset number), map (action) to (Modul8 keyword ) in (Layer number)”


Connect a keyword to a layer - method 2
Select the knob control icon and drag it into your module
Scale your control to suit your needs
Type the Modul8 keyword “ctrl_layer_alpha” into the ”To:” field
Select the layer destination/target
Restart and save the module
Connect a keyword to a layer - method 3
Select the knob control icon and drag it into your module
Scale your control to suit your needs
-
Click the “browse” button to display the “Keywords Browser” window (see fig. 57). This windows is a keyword library. To select the ctrl_layer_alpha, go to “ctrl” > “layer” > “alpha” then click on the “Keyword Connect And Close” button.
If you want to keep the keywords browser window open, hit the “Keyword Connect” button.
The selected keyword name will be entered in the “To:” input field.
Figure 57. Connect a keyword to a layer -method3 - step 3 - Keywords Browser. Select the layer destination/target
Restart and save the module
4. Connect a keyword to the active layer
When you connect a keyword to a layer, choose “active layer” in the “In: Layer list”. The selected layer will be the target of your keyword.

5. Connect a keyword to all layers
When you connect a keyword to a layer, choose ”All layers” in the “In: Layer list”. The selected keyword will be applied to all layers.
It’s very useful in many situations, for example if you want to synchronize movies in several layers (use keyword: “ctrl_layer_movie_shuttle1”) or trigger the same media on multiple layers (“ctrl_layer_media”).

6. How to build a layer contextual module
In most cases creating a layer contextual module is sensible, otherwise you would have to create a very large module with an identical set of controls for every layer, potentially creating a lot of clutter on your screen.
There are three points to check when you build a module:
- In the “Module Attributes” panel, the “Layer contextual” checkbox must be checked when you create a new module
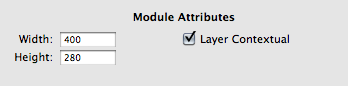
Figure 60. “Layer contextual” checkbox must be checked . -
Ensure that every control you add in your module has “Auto-Serialize” checked. This feature saves control values and displays them when you save your Modul8 project. In other words, all control properties are stored within the document of your project. If you don’t check “Auto-Serialize”, position and values of controls will be lost when you quit Modul8. The next time you will open a saved project, contextual control values of your module will be restored to their initial values.

Figure 61. "Auto-Serialize" checkbox should be checked. The “Auto-Serialize” checkbox is checked by default. How ever, the automatic serialization cannot save external data. For example, if you create a script that records data retrieved by a control in a list and you want to store this list of data, you will have to use another way to save script data. Use dictionaries in the “Serialize”/”Deserialize” script blocks (see recipe #17)
An exception to this rule is the “Draw View” control. When you add scripts to fill the ”Draw View” control and check “Auto-Serialize” and the layer contextual attribute, the drawings applied within the “Draw View” module will be saved.
- And finally, when you use ”Keyword Connect”, ensure that its connection target is set to the “Active Layer”.
You can test your module even if you don’t have any keywords connected to controls. You might be able to see different values for your controls for each layer. To know if you have succeeded, tweak your controls at least on two different layers. Save your project, then restart Modul8 and open your saved project. Values you adjusted for each layer should be the same as when you quit Modul8.
Figure 62. ensure that the Keword Connect target is set to the "Active Layer".
7. Preview and trigger media with the media preview control
The media preview control can display media from the mediaset. It can show media from 1 through 128. But it can trigger media from 1 to 135 (version 2.6). Special media start at index 129.
Special media index:
129 Test pattern / 130 Canvas / 131 Text / 132 Video input 1 / 133 Video Input 2 / 134 Video Input 3 /135 Video Input 4
Add a media control on your module
-
Type the media id in the show media attribute field (to show the media id, add +1 to the media id shown in edit mode. This attribute will start at number 1.
This step will display the media in the control.
Figure 63. display the media in the control. Set the “Down” attribute value to the media ID (not the show media index). When you click the media control, the keyword will use the “Down” value.
Go to the “Keyword Connect” panel and choose the “Down” state action, then select the field ”To:” and type “ctrl_layer_media” or use the ”Pick in UI” button and click on any media from the mediaset.

Figure 64. Add the ctrl_layer_media keyword to the media control. Select the layer target - in fig. 46 the layer target is “Layer 1”.
Ensure that the map preset and action state is the one you want. Modul8 keeps the last preset and action state when you use a new “Keyword Connect” on another control and when you add a new control on the module.
For instance, if you added ”Keyword Connect” on Map 4 in the “up” action state, and you add new media, “Keyword Connect” will display by default the last preset and action type, in this case it will display Map 4 and the up state.
8. Map multiple actions to one control with Keyword Connect
Map preset lists have ten different presets, controls can bind up to four kinds of actions, which means there are from 10 to 40 actions you can do with a single control.
Build a background color selector module
This recipe will use the color picker control to change Modul8’s background color. Figure 65 shows the color component (red, green, blue) bindable actions. We will connect each color component to background color component.
Add a color picker component to the module and scale it until you have comfortable space to select color.
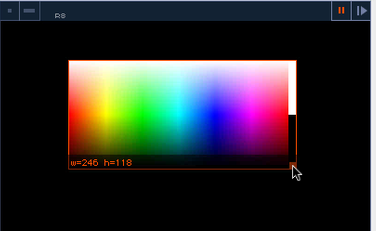
Figure 65. Build a background color selector module - step 1. Select “Map 1” preset: we will use this preset to connect the red, green and blue levels for a background color.
Select the red value in the action list for “Map 1” preset
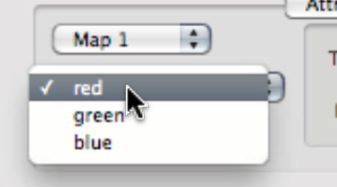
Figure 66. Build a background color selector module - step 3. Click the “Pick in UI” button to start the Keyword pick/record mode
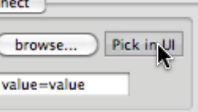
Figure 67. Build a background color selector module - step 4. Click on the red background slider to pick up the Modul8 keyword related to the red background
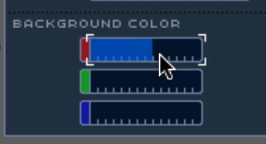
Figure 68. Build a background color selector module - step 5. You should now have “ctrl_master_backgroundColorR” displayed in the keyword input field
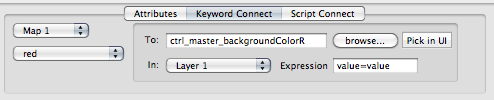
Figure 69. Build a background color selector module - step 6. Now repeat this procedure again from step 3 with the green component. Select the green value in the list

Figure 70. Build a background color selector module - step 7. Click the “Pick in UI” button
Click on the background slider for the color green. “ctrl_master_backgroundColorG” is now displayed in the keyword input field.

Figure 71. Build a background color selector module - step 9. Repeat the process for the blue component, select the blue value in the list
You can also type in the corresponding keyword instead of using the “Pick in UI“ button,
the red background component keyword is “ctrl_master_backgroundColorR”,
the background green component keyword is “ctrl_master_backgroundColorG”.
It’s easy to understand that only the last letter defines the color.,Just type “ctrl_master_backgroundColorB” to set the background’s blue keyword component
Figure 72. Build a background color selector module - step 11.
9. Use the pad control to trigger and tweak noise and saturation pixel FX
In this recipe, we will build a module that uses the “Pad Control” to perform multiple actions.
This module will enable the saturation and noise FX, then use the X and Y position to change the saturation and noise values of the selected layer.
Add a pad control and scale it so you have enough space to work with.

Figure 73. pad control. Ensure “Map 1” is selected, then select “x” in the action list; we are now ready to connect the x pad property to a keyword.
Click the “Pick in UI” button then select the pixel FX saturation knob (the keyword will be picked even if the saturation mode is set to OFF.

Figure 74. they keyword is picked even if the saturatuib lide us set to Off. You have now connected “Map 1” to the “x” property with the keyword “ctrl_layer_pixelFX_saturationLevel”. Now select “Active Layer” so that only the selected layer will receive this message.

Figure 75. Saturation knob control is connected to the x axis Select the “y” value in “Map 1”, the “y” value will be connected to the noise value related keyword.
Click the “Pick in UI” button and select the pixel FX noise knob.
You now have “Map 1” connected to the “y” property with the keyword “ctrl_layer_pixelFX_noiseLevel”. Now select “Active Layer” so that only the selected layer will receive this message.

Figure 76. Noise level knob control is connected to the y axis . If you test the module (ctrl ⌥ R to restart and focus the layer) the saturation and noise value will be displayed only if you have the saturation and noise pixel FX turned ON.
The second part of this recipe will show you how to turn the saturation and noise mode ON.
The pad value has only two parameters you can connect. We have used up all possibilities of ”Keyword Connect” in “Map 1”. Thankfully, there are nine more map presets.Select a new map preset - use “Map 2”. You will notice that the “y” value is now selected.
Select the “x” value instead of the “y” value.
Click the “Pick in UI” button, then click the saturation button in the Modul8 user interface. The keyword that enables saturation is “ctrl_layer_pixelFX_saturationOn”.
When you test the module you’ll notice that if you drag the mouse to the left edge of the pad control, the saturation is disabled. This is due to the value returned by the control; when you reach the left edge, the value drops to 0.0 and turns off saturation.
To correct this, we will use an expression and force the value sent to the keyword, because what we want is to have a static value sent to the keyword.
Turn “value=value” into “value=1”.
Figure 77. use value=1 expression to force to enable saturation effect. Return to step 9 and select the “y” value instead of the “x” value
Click the “Pick in UI” button, then click the noise button in the Modul8 user interface. The keyword that enables noise is “ctrl_layer_pixelFX_noiseOn”.
Change the expression” to “value=1”.

Figure 78. use value=1 expression to force to enable noise effect.
How to build modules with script
This chapter will introduce you to the Modul8 scripting environment and the Python scripting language. An introduction to this language is included at the end of the manual, and you can find the official Python reference guide at http://docs.python.org. I also recommend this website: http://www.java2s.com/Code/Python/CatalogPython.htm.
To use the script editor you need to have a module selected in the module editor, then at the bottom of the window select the “Scripts” tab.
Understanding the Modul8 rendering thread process
Modul8 is a multithreaded application. It means that several tasks can be executed simultaneously. For example, while a pixel filter is applied, new frames can be rendered on screen, new movie data can be streamed from the disk, etc.
So how are scripts executed in this context? The scripts are linked to the rendering thread.
The rendering thread is the place where animation is displayed. In other words, scripts are executed between two rendered frames.


These figures show that a script will never be executed at the same time as a frame is displayed. Thanks to the rendering thread, scripts can be synchronized to animations since script execution and rendering are linked to the same process. It also means that if your script uses a loop, new frames won’t be rendered until the loop is finished. That’s why the only way to animate an object is to call a script after a frame is displayed, and the only way to do it is to call script written inside a time based script block called “PeriodicalEvent”.
There are several script blocks. Each script block handles a specific event in Modul8. For example, there is a script type that is called each time a MIDI value is changed, when a module is launched for the first time, or when a control in the user interface is modified.
Each module executes its own list of scripts. All you have to do is select the required script block and type in your script. Scripts will be called automatically when the corresponding event occurs.
Modul8 editor script blocks and types in depth
The Modul8 script editor is divided into scripts blocks. Each block works like a function. It is linked to a specific event such as a module starting up, a MIDI event, module message, etc. Some scripts are called only once because the related event only occurs once (Init, Serialize, Deserialize, Finish). Other scripts are called more often because their events are linked to run time (a constantly recurring event) or the user interface.
Use the drop down menu in the script editor to select the block you want to edit. The “Init()” block is displayed by default when you open the Module Editor.
The selected script block type is displayed until you select another one, which is very helpful when you want to compare two scripts from different modules. All you have to do is to click on another module in the list and its script will be displayed. It’s also very helpful when you want to copy the same code from one module to another.
Init()
The “Init()” script block is called/executed each time the module is started or restarted. This script is the first to be executed. This is where you will declare global variables, functions and anything that needs to be initialized first.
MessageEvent(msg,param)
The “MessageEvent(msg,param)” block is executed each time a control is modified in the module user interface or when the “sendMessageToAllInstances” function is triggered (see Recipe #27). The message will be sent only if a message has been previously set in “Script Connect”. This script returns two variables:
- msg: a text string that defines the message name
- param: the value attached to the message. When the message is sent directly by a control, the param variable is a dictionary that embeds the name of the control and its value - for example: {'NAME': 'mybutton', 'value': 1.0}. Except for the draw view control, “param” is always one of the parameters you can bind from the “Keyword Connect” action - for example, selection for a list : {'NAME': 'name', 'selection': 1.0} or green for a color picker: {'green': 1.0, 'NAME': 'Untitled'}.
DirectEvent(type,param)
The “DirectEvent(type,param)” script is called each time a message is received by an internal or external device. This script can listen to keyboard key signals, MIDI commands and DMX commands.
DirectEvent returns two variables:
- type: a text string that defines the signal type name. Types are KEYUP, KEYDOWN, MIDI and DMX.
- param: parameters sent by the device. “param” is a dictionary with different keys and values depending on the type of device.
This script block is useful when you want to add functions with keyboard shortcuts, for example. It’s also very helpful if you want to create more complex MIDI map or when you want to create a MIDI to DMX bridge.
KeywordEvent(keyword,param,layer)
The “KeywordEvent(keyword,param,layer)” script is called each time a Modul8 keyword is modified or even triggered. This is where you can scope out every action from the Modul8 user interface. This script also tracks keywords that are not displayed in the user interface as direct keywords. This script is perfect to update the visual state of your controls inside the module you have created.
KeywordEvent returns three variables:
- keyword: a text string with the Modul8 keyword name.
- param: the parameter sent by the Modul8 keyword. It can be a number or text.
- layer: the layer number of the targeted keyword action. This number goes from 1 to 10. When you use ”Keyword Connect” and use “All Layers” as the target layer, the layer number returned is -2
Be careful!!!
Never type a Modul8 keyword control phrase inside the “KeywordEvent” block, this will cause Modul8 to crash, because when you set a Modul8 UI keyword inside the “KeywordEvent” block, it creates an infinite loop that writes and reads keywords simultaneously.
For example, never ever, ever, ever write modul8.setValue('ctrl_layer_alpha', 0.5, 0) within “KeywordEvent”.
PeriodicalEvent(elapsed)
“PeriodicalEvent” is called periodically when the module is not stopped or paused.
The script will be executed between two screen refreshes. In other words, a lot of factors must be considered when you write scripts inside the “PeriodicalEvent” block: number of layers, filters, size of media and display output resolution. This block is the place where you will calculate layer animations such as filters or the changing of a layer’s position.
PeriodicalEvent script returns one variable:
- elapsed is the number of seconds elapsed between the last executed PeriodicalEvent script.
PauseEvent(paused)
“PauseEvent” is called when the play or pause button of the module is pressed. Every module has a play and pause button located in the upper right corner of the module.
PauseEvent returns one variable when you click the “play” or “pause” button:
- paused is the number 1 or 0.
When the “pause” button is pressed, the “paused” variable is set to 1.

When the “play” button is pressed, the “paused” variable is set to 0.

Serialize(outDict)
“Serialize” is called when you save a Modul8 project. This script embeds a dictionary:
- outDict is a dictionary which is saved with the project.
Use this dictionary to store data related to your saved project. The “outDict” dictionary can only store data. You cannot store pictures or media, just python data like lists, variables, texts, numbers, dictionaries and tuples.
“Serialize” is perfect for saving presets and variables that cannot be saved with the “autoserialize” feature.
Deserialize(inDict)
“Deserialize” is called when you open a saved Modul8 project. This script returns a dictionary:
- inDict is a dictionary that holds data that has been previously stored within the “outDict” dictionary. When you save your project all variables and objects contained in the outDict dictionary are “transfered and saved” into the inDict dictionary.
Finish()
“Finish” is called when you restart a module (⌘ ⌥ R) , stop a module or stop all modules. Finish is also called when you quit Modul8. This is where you will write scripts to save preferences with your module. (See recipe #16.)
Note that all these functions can be found in the menu “Modules” > “Restart”/”Stop”/”Stop All”.

My first script: how to scope values, scripting tools
-
Create a a new module, open the script editor (⌘ ⌥ E) and click on the ”Scripts” tab button.
The default view of your script is the “Init()” block. The first script will be test message script. When you write code it’s important to scope values that you write to be sure that actions and variables are executed as planned.
You can scope values using the Python function “print”. The “print” function sends the message you want to the output window. -
Inside the “init” window, type in the following phrase:
The “print” keyword and ”Hello world” must be colored. Python and Modul8 functions are colored in dark purple whereas text strings are colored in dark red.print 'Hello, this is my first script'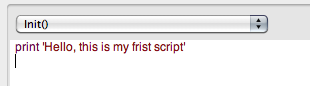
Figure 85. Script window - Python and Modul8 functions are colored in dark purple whereas text strings are colored in dark red.. - To display this message, open the “Script Output” window from the menu “Modules” > ”script” > ”Show Script Output”, or use the keyboard shortcut ⌘ ⌥ O. The output window is blank until you call the “Init()” script.
- Restart the module to call the “Init()” script. From the menu “Modules” choose “Restart”, or press the keyboard shortcut ⌘ ⌥ R.
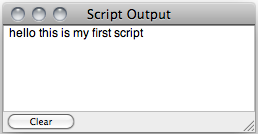
Figure 86. print message is displayed on the Script Output window.
Comments
A good practice in scripting is to add short comments to explain what variables or functions are supposed to do. These comments and notes are not meant to be displayed on the script output window.
Use the symbol # to start a comment. Everything that is written after the # sign will be interpreted as a comment until you hit the return key and start a new line. Comments are displayed in green.
In the current script, type:
#this part of the script won't be displayed or read by the script
You can use comments when you want to disable part of a script. It ’s very useful when you want to debug a script or keep an older version of a part of your code. For instance, once your module works perfectly you can hide script lines that use the print function.
Comment/Uncomment tools
Adding comments might be very time consuming when you want to hide large parts of your code. To hide a portion, highlight the script you want to comment and go the menu “Modules” > “Script” > “Comment” or use the keyboard shortcut (⌘ ⌥ C).
You can also uncomment a script using the “Uncomment” tool. Highlight the script you want to uncomment, then go to the menu ”Modules” > “Script” > “Uncomment” or use the keyboard shortcut (⌘ ⌥ U).

Script indent tools
“Shift Right” and “Shift Left” are scripting tools that help you to indent you script correctly. These tools are located under the menu ”Modules” > ”Script”
- Shift Right (⌘ ]) indents the selected script to the right with a tab space
- Shift Left (⌘ [) indents the selected script to the left (if possible)
About indentation
Unlike other programming languages that use curly braces to define script structure hierarchy, the Python scripting language defines script structure hierarchy with text a indentation system. In other words, the way you use punctuation will define how objects or expressions are nested and structured. Indentation can be ”spaces” or ”tabbed spaces”. Modul8 by default uses a tab to indent scripts. This is much easier for identifying script blocks compared with simple spaces.
top level expression
	sub level expression
		sub level content 1
		sub level content 2
For example, if you want to write a test function that prints a message in the output window, you need to know what the function’s name is and what the function will do, and you need to ensure that only what’s inside the function will be executed by the function. The action to print out a message will be enclosed with the function.
def test():
	print 'hello'
Indentation is needed when you want to compare expressions and create rules to make a choice. Sometimes a choice can be made only when all required conditions are completed. In a Python script, the indentation will help you to sequence questions and consequences.
The following phrase: ”if condition A is fulfilled then you have two options: choose option B if condition B is fulfilled otherwise, choose the default option” can be translated into this following structure:
if condition A is fulfilled:
	if condition B is fulfilled:
		then choose option B
	otherwise:
		choose the default option
In Modul8, this phrase can be translated into the following script fragment:
if conditionA == True:
	if conditionB == True:
		choice = optionB
	else :
		choice = defaultOption
Resync
The “Resync” function is accessible from the menu ”Modules” > “Script” > “Resync”, or you can use the keyboard shortcut (⌘ ⇧ R). This function forces the current script to use modified scripts. “Resync” does not refresh the “Init()” script that is called only when the module is started or restarted. Only running scripts can be re-synched. In other words, you might use this feature only if you modify a script in one of the following script blocks:
MessageEvent, DirectEvent, KeywordEvent, PeriodicalEvent, PauseEvent.
“Init”, “Serialize”, “Deserialize” and “Finish” are only called once. To refresh any kind of script use the Restart (⌘ ⌥ R) instead.
Debugging and troubleshooting
No one is perfect! Bugs and errors are part of the programming process, especially when you are new to a programming language. Hopefully there are tools to help point out these errors. The script editor has a script error window, choose ”Modules” > “Script” > “Show Script Errors”
This window displays error information and a hint, along with direct access to the script line where the bug is located.
The window is divided into three parts, a list of errors, a detailed view of the selected error, and navigation buttons to browse all errors with a button to access to the incriminating script line.
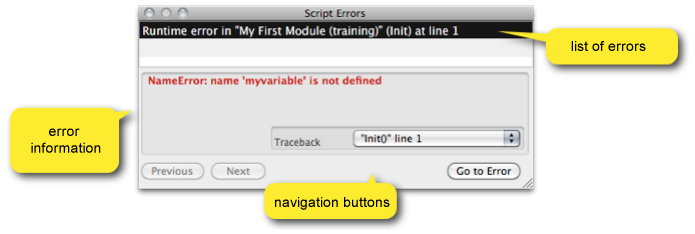
Errors detected during an execution are called “Exceptions”. You can track these ”Exceptions” errors and details with either the error information or with a “Try/Except” Python statement.
The Try/Except statement is very useful for adding security to your script and help make choices depending on the problem reported by the exception.
If you know the exception, you can tell the script what to do when this error occurs. You can just print out the error name and error detail, or you can stop the module.
The following script will return a “ZeroDivisionError” exception:
print 3/0
With the “try/except” statement, it’s possible to avoid the bug and print out a message when it occurs.
try:
	print 3/0
except ZeroDivisionError:
	print "division by zero!"
This script will execute the code inside the except block because “3/0” is impossible. In other words, the script tries to execute “3/0” and cannot complete the operation, and thus executes the except block because the error message was the same as the encountered error.
If you don’t know the except name, you can use “Exception” as except name. All errors will be packed into this except name, but the detail will be the one corresponding to a specific except.
try:
	print 3/0
except Exception,detail:
	print detail
#it will print : integer division or modulo by zero
The following example shows a complete use of the “try/except/else” feature:
def divide(x, y):
	try:
		result = x / y
	except Exception, detail:
		print 'error:',detail
	else:
		print 'result is ', result

divide(3,0)
#returns: error: integer division or modulo by zero
divide(3,2.0)
#prints out: result is 1.5
See a list of built-in Python exceptions at: http://docs.python.org/library/exceptions.html
Good practices
When you start a script, a good practice is to comment important parts of your script. Add simple phrases to explain what the following function or script is supposed to do.
#This script by «Author» this script ... blah blah blah
#if your script contains many lines and you can split this script into different parts, it is smart to use separations between important blocks like Variable declaration or functions definition or init execution

#VARIABLES (this comment separator helps to )
s = 2 # init speed (put information on the same line just after the script)
ms = 1 #master speed
#frequency (add the comment the line before )
f = 3


#FUNCTIONS (another comment line separator to tell that following scripts will set up functions)
#set module speed
def setSpeed():
	ms = modul8.getValue('ctrl_master_speed', 0) * s
	print ms

##use comment to express your doubts and if needed to disable temporarily a part of your script
#def functionImNotSure():
#print "function that i'm not sure"

#INITIALIZE (another comment line to tell that you are done with functions and you are about to use previous statements to initialize your script)
setSpeed()
Comments are useful if you modify a module. Add a start and finish comment line with your name for instance to know that you’ve been editing a part of the script. In the case of a script replacement, copy the part you want to edit, then use the comment tool to comment the highlighted script you are about to edit.
includeLayerPropriety = 1
#---- module edit starts here
added script content
#---- module edit finishes there
includeKeyDict = {'ctrl_layer_pixelFX': 1, 'ctrl_layer_auto': 1, 'ctrl_layer_media': 1, 'ctrl_layer_color': 1, 'ctrl_layer_transformer': 1}
Avoiding embedded objects completion problem
An expression or object has a start and an end. The “start” and “end” elements have specific structures. For example:
- Text strings start and end with either a quote ' ( text ='text'+'string' ) or a double quote " ( text = "text"+"string" )
- Dictionary starts with a left curly brace { and ends with a right curly brace } dict = {'key': value}
- Expressions and some function containers start and end with parenthesis () str(((2/3)+(5*4)/var))
- Lists and matrixes start with a left square bracket [ and end with a right square bracket ] mylist=[[1, 2], [3, 4]]
When you write a script with one of these opening and closing structure signs, make a habit of first writing the opening and closing signs, and then writing inside them. This will prevent you from omitting a closing sign, especially in case of cascading sub arguments.
Encountered errors
There are different types of bugs: programming errors that can be interpreted by Modul8 that are reported to the script error window, bugs that are module misconceptions, or simply oversight.
List of the most commonly encountered errors:
- Missing component: sometimes a part of the script or a component of your module can be missing (a message name or a control name) that causes the module to malfunction. If you expect a message from a control, ensure that the message is filled and typed in correctly
-
Off range values: when you set attribute values for a button or any range control (like a slider) it is possible to enter numbers that Modul8 keywords cannot use. Most Modul8 keywords (especially ctrl_ keywords ) can only use numbers in the range between 0.0 and 1.0.
Even if the control returns a correct number within the required range, calculation of this value can be off range. It can occur if the output value is modified with a calculation. - Undefined variable: it happens when a global variable is missing. When you use a global variable to perform a calculation, the global variable name must be set before you use it. This may happen when you perform a variable incrementation in the ElapsedEvent.
-
Text case typing can cause an undefined variable. Scripts are case sensitive. For instance, “myvariable” and “myVariable” are interpreted as different variables.
myvariable = 3 result = myVariable*2 print result #this will return an error because myVariable does not exist - Zero division: be careful when dividing a number that the denominator is not equal to 0 (integer or float is the same). It may happen when a control value is retrieved. For example, if you get the value of a button when the state is Up the default value of a the UP state of a button is 0.
-
Integer vs. float: sometimes the result of a division is not the one expected. For instance, 3/2 should return 1.5, but if you divide two integers, the result will be an integer and 3/2 would return 1 instead of 1.5. So either the denominator or a numerator has to be a float number.
print 3/2 #returns 1 print 3.0/2 print 3/2.0 #returns 1.5 -
Condition Equal Expression Error: if you want to define a condition, the natural expression to compare two elements would be “A=B”, but in Python this is not an expression. “A=B” means that you are assigning/copying the value in the variable B to the variable A. See the below example:
if A=B:
	print "ok A equals B"
#returns a Syntax error
#correct script is: if A==B: print "ok A equals B" -
Type error: you can only do calculation with objects of the same kind. For example, it’s impossible to combine a text string and a number. The software cannot tell if the result is a number or text and how to calculate the arguments together.
print '4'+3 #this statement is impossible: is it a string concatenation or math operation ? #correct string concatenation print '4'+'3' #returns 43 #correct math operation print 4+3 #returns 7 -
Script indentation error: don’t forget to add the correct indentation when you create a function or when you add a condition or loop.
#indented block error
def myfunction():
print 'myfunction'
#indented block error for conditions if condition: print 'result' else: print 'other result' Missing Parenthesis -
Missing parenthesis: ensure that parenthesis are there when you define a function, even if your function has no parameters.
##function - invalid syntax #parenthesis are missing def myfunction: print 'myfunction' -
Missing colon error: don’t forget the colon after a parenthesis when you define a function.
##function - invalid syntax #colon is missing def myfunction() print 'myfunction' -
String quote and double quote error: when you want to use a text string with a special character like a quote or double quote, ensure that you use the correct encapsulator sign. For example, if you want to use: text = 'it's cool' the script uses 3 quotes, it means that your text string is not complete. Use double quotes to be able to use a single quote within the text: text = "it's cool". The quote will be considered as a text string and not as a string declaration opener sign.
Using double quotes to encapsulate text: text = ""cool"" is wrong because "" is considered as a string. cool is considered as a variable and ""cool is interpreted as a concatenation error, because the character plus (+) is missing. Instead use text = ' "cool" '. Quotes will be considered as string declaration signs. -
List vs. tuple mix up error: if you mix up parenthesis and square braces you might be confused when you read and write values. A list uses square braces to define a list type object whereas a tuple uses parenthesis. A tuple is a list of values that you read the same way as you read a list but you can’t write inside a tuple once it is defined, unlike a list where you can append values.
tuple = ('a','b','c') list = ['a','b','c'] print list #returns ['a','b','c'] print tuple #returns ['a','b','c']. Confusing isn't it? print tuple[1] #returns 'b' print list[1] #returns 'b' tuple.append('d') #returns an error: AttributeError: 'tuple' object has no attribute 'append' list.append('d') print list #returns 'a,b,c,d' -
Dictionary key setup error: a dictionary is built with a couple of clauses for each element of the dictionary. The clause is made up of a Key and a linked value. Although the value can be either a number, string or object, the Key is always a text string. Always ensure that the left part of the clause is a text string.
dict = { key:'linked value' } #returns an error. key is not defined, key must be a text string #correct script dict ={ 'key':'linked value' } -
Boolean case error: if you use a boolean keyword, be sure to write “True” and “False“ with a capital letter:
myvariable = true #returns an error NameError: name 'true' is not defined #correct script myvariable = True -
Key error on MessageEvent: if you try to retrieve a value with the wrong key from the MessageEvent(msg,param)’s param, a key error will be returned. Controls have different param keys depending on the type of control. For example, if you use a pad control, param keys will be either ”x” or ”y”, whereas a button MessageEvent param key is a value. In other words, when you use a pad control the following script will return a message:
print param['value'] # returns an error : KeyError: 'value' #correct script for the pad control print param['x'] -
Reserved keywords and script name error: be careful when you define a variable that uses the reserved words and keywords used by Python or Modul8 to perform actions or operations. For example, if you want to create a couple of variables to set the “in” and “out” values of a media:
You will encounter a problem with the variable, because it is used by Python to ask if a variable exists inside an object, like in this sentence:out = 10 in = 2for var in object: print var or if 'text' in object: print 'text string exists in object'Here is a non exhaustive list of words that you must not use as variable names:
for, is, in, len, if, not, def, and, or, break, finally, try, del
How to communicate with a module
This chapter will show you how to control, send and receive information to visual elements and data from a module.
When a script is executed, the software splits script orders into three categories:
- General Python scripts: related to variables and Python objects
- Module element related scripts: visual elements such as controls and shapes or, any script set or get actions related to elements located inside a module that always start with: module.
-
Modul8 keyword related script: related to Modul8 software actions or information.
Each time you want to read information from the current project, media, layer, the main Modul8 user interface action that starts with modul8.
If you want to talk to a module control or shape, start your phrase with module.
If you want to talk to a Modul8 element or project, start your phrase with modul8.
Interact with module data
This part will focus on Controls (buttons, sliders, knobs, etc). To control the main user interface from a module, it’s necessary to send message events and translate them into actions and have a visual feedback on your module when you get information from the main Modul8 user interface.
10. How to send a message from a control
This exercise will show how to send a message from a slider control and print out a message and a value into the script output window.
Add a control to your module UI (add a slider for this exercise):
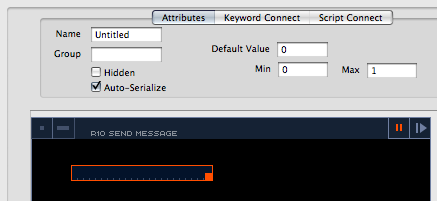
Figure 93. How to send a message from a control - step 1. In the contextual area, click the “Script Connect” tab.
In the “Script Connect” tab, type ”sliderMessage” in the ”Send Message” text field.
When a user manipulates the slider, the slider will send a value to the MessageEvent script through the message defined by the ”Send Message” text field.
Figure 94. How to send a message from a control - step 3. Click the ”Scripts” button and the script editor tab will appear.
Select the “MessageEvent(msg,param)” script block. This script block will retrieve messages sent by controls.
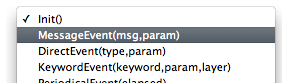
Figure 95. How to send a message from a control - step 5. To display the message name and value returned by the slider in the “Script Output” window, type in:
print msg
print param['value']
Open the “Script Output” window (⌘ ⌥ O) , and restart the module (⌘ ⌥ R). Then move the slider to print out the message in the script output window.
11. How to read a message sent by a control
When a message is sent by any control, value(s) are sent directly to the MessageEvent(msg,param) script. This script receives two variables.
- msg: a variable that includes the triggered message name
- param: a variable that includes the control name and returned value of the control. The “param” variable is a dictionary, which means you need a key (a keyword) to read data from it.
To read a control’s name defined in the “Attributes” tab, use the ”NAME” key : param['NAME']. By default, every control’s name is ”Untitled” until you change it in the “Attributes” - “Name” field.
For example, in recipe #10, after the first step, change the slider’s name from ”Untitled” to ”sliderControl”.

print 'the message event:',msg
print 'was sent by a module named', param['NAME']
#returns
#the message event: sliderMessage
#was sent by a module named sliderControl
The Name property is important if you have multiple controls with the same message and you want to perform a specific action depending on the name of the module. For instance, it can be helpful to name each control with a letter and a number corresponding to a layer. In the “MessageEvent” script it will be easy to parse a control name and use it as a layer target.
To get a value returned by the control, use the 'value' key: param['value']. Sliders, knobs, buttons, radio buttons, checkboxes, media preview and numeric field controls use the 'value' key to return a value from the “param” dictionary. Other controls use other keys.
Comprehensive list of control param keys
| control type | action attribute | key | script |
|---|---|---|---|
| button | Up | 'value' | param['value'] |
| button | Continuous | 'value' | param['value'] |
| button | Down | 'value' | param['value'] |
| radio button | Up | 'value' | param['value'] |
| radio button | Continuous | 'value' | param['value'] |
| radio button | Down | 'value' | param['value'] |
| checkbox | Up | 'value' | param['value'] |
| checkbox | Continuous | 'value' | param['value'] |
| checkbox | Down | 'value' | param['value'] |
| media preview | Up | 'value' | param['value'] |
| media preview | Continuous | 'value' | param['value'] |
| media preview | Down | 'value' | param['value'] |
| slider | value | 'value' | param['value'] |
| knob | value | 'value' | param['value'] |
| numeric field | value | 'value' | param['value'] |
| text field | text | 'text' | param['text'] |
| pad | x position | 'x' | param['x'] |
| pad | y position | 'y' | param['y'] |
| list | selection | 'selection' | param['selection'] |
| grey picker | grey level | 'level' | param['level'] |
| color picker | red value | 'red' | param['red'] |
| color picker | green value | 'green' | param['green'] |
| color picker | blue value | 'blue' | param['blue'] |
| swatch color picker | red value | 'red' | param['red'] |
| swatch color picker | green value | 'green' | param['green'] |
| swatch color picker | blue value | 'blue' | param['blue'] |
| swatch color picker | opacity /alpha | 'alpha' | param['alpha'] |
| x position | 'X' | float number | param['X'] |
| y position | 'Y' | float number | param['Y'] |
| pen tablet pressure | 'PRESSURE' | float number | param['PRESSURE'] |
| pen tablet tilt X angle | 'TILTX' | float number | param['TILTX'] |
| pen tablet tilt Y angle | 'TILTY' | float number | param['TILTY'] |
| pen tablet rotation angle | 'ROTATION' | float number | param['ROTATION'] |
| mouse press/pen tablet down | 'ACTION' | 'MOUSEDOWN' | param['ACTION'] |
| mouse drag/pen drag | 'ACTION' | 'MOUSEDRAGGED' | param['ACTION'] |
| mouse relase/pen tablet up | 'ACTION' | 'MOUSEUP' | param['ACTION'] |
Note that the NAME key uses uppercase characters whereas value keys use lowercase characters (except for the draw view control).
12. Trigger an action with a specific message
When a message is received in the “MessageEvent(msg,param)” script, to prevent it from making errors, it’s necessary to identify a message and what to do with the linked value.
The next script will print out different messages depending on a received message and key. Let’s start with the identification of a toggle push button state.
Add a push button control to the module. Keep the default ”Up” and ”Down” attributes (Up=0/Down=1)
In the “Attributes” panel check the toggle parameter.
Go to the “Script Connect” and type “'onPush'” into the ”Send Message” text field
Open the script editor at the “MessageEvent(msg,param)” script block and type in:
if msg == 'onPush':
if param['value'] == 1:
	print 'toggle ON'
else:
	print 'toggle OFF'
Open the “Script Output” window (⌘ ⌥ O) , and restart the module (⌘ ⌥ R) then click the button to print out message in the script output window
Let’s have a closer look at the script. if msg == 'onPush': this sentence says that if the received message is “onPush”, then something has to be done. if param['value']==1: means that if the value returned by the button equals 1, then do something. In the “Attributes” panel, as shown previously, the “Down” state attribute value is 1. You can consider that if the value is equal to 1 then the current state is set to the “Down” state. Then you can print out the message 'toggle ON' with print 'toggle ON'. The else: statement means that for any other values, a final action has to be performed. Here the other value of the selected state is the “Up” state, which is equal to 0. Then you can type print 'toggle OFF'.
13. How to change the value of a control with setValue
This recipe will show how to set the visual aspects of a module. For instance, it can be helpful to set up the visual aspects of a control that is initialized by the module at startup. Let’s build a slider control where its initial state is driven by the speed variable:
Add a slider control on the module workspace
In the “Attributes” panel, change the control “Name” property from 'Undefined' to 'control'
In the “Init()” script event block of the editor, set up the speed variable by typing:
speed = 0.5Then tell the current module to set the “slider” control value to the speed variable value, by typing:
module.setValue('control', 0, speed)Restart the module (⌘ ⌥ R)
In depth:
Let’s have a closer look and break down the sentence module.setValue('control', 0, speed) into sub script phrases:
module. means ”Let’s talk to the current module.”
module.setValue( means ”Tell the current module to set an action to what’s inside parenthesis.”
module.setValue('control' means ”Tell the control named 'control' in the current module to do something.”
module.setValue('control', 0 means ”Tell the control 'control', to set the attribute value to something.”
module.setValue('control', 0, speed) means ”Tell the control 'control', to set the attribute value to the speed variable value.”
A slider has only one argument - the position of the slider. In other words, there is only one argument in the list of arguments. The first index of a list is 0, so the slider’s one and only attribute value index is 0. A pad control has 2 indexes: index 0 is linked to the x position value and index 1 is linked to the y position value.
14. How to initialize a pad control
This exercise will show how to initialize the cursor of a pad control with a “xinit” variable and a “yinit” variable.
The xinit variable will set the “x” position of the cross cursor on the pad control, the yinit variable will set the “y” position of the cross cursor on the pad control.
Add a pad control to the module, and change the ”Untitled” name attribute to ”pad”.
Set the Max values for the x and y axis to 100. The cross is locked to the bottom left corner of the module.
Go to the “Init()” script event block of the script editor and initialize the xinit and yinit values. Type:
xinit = 50
yinit = 50
Set the x position of the cursor of the pad control with the variable xinit, type:
module.setValue('pad', 0, xinit)Set the y position of the cursor of the pad control with the variable yinit, type:
module.setValue('pad', 1, yinit)Restart the module (⌘ ⌥ R)
15. How to read a control’s value with getValue
To control the Modul8 user interface with a control without the “Keyword Connect” feature, the connection has to be done by reading the position and value of a control. The next exercise will show how to retrieve the value of a control and print it to the script output window.
Add a knob to the module and change its attribute name to ”knob”.
In the “Attributes” panel, change the default value to 0.5.
Open the script editor and go to the “Init()” script event block.
Now, the following script will print out the default value set previously to the script output window. Type
print module.getValue('knob', 0)Open the “Script Output” window (⌘ ⌥ O) , and restart the module (⌘ ⌥ R) , then tweak the knob to print out the message on the script output window.
In depth:
Let’s have a closer look and break down the sentence module.getValue('knob', 0) into sub script phrases:
module. means ”Let’s talk to the current module.”
module.getValue( means ”Tell the current module to get information from what’s inside the parenthesis.”
module.getValue('knob' means “Ask the control named 'knob' in the current for information.”
module.getValue('knob', 0) means “Ask 'knob' control for its value attribute.”
Data storage Management
There are different ways and places where data can be stored:
- Into RAM: for immediate data access - this is what scripts do when they are initializing variables. There are different ram access memory types. Some are called ”global” variables which are available as long as the module is running, others are called “local” variables, which means they only exist within a local process such as a script loop.
- Within a module: setDefaults() / getDefaults() functions
- Within a project file: inDict/outDict dictionaries (Serialize / Deserialize scripts)
- Within the Modul8 software preferences: getSharedDictionnary() function
16. Store and read data in a module with setDefaults() & getDefaults()
A very convenient way to share data from a module within a Modul8 project is to encapsulate it into the module. For instance if you have a list of filters presets or prerecorded animation path coordinates, and you want to access it anytime, in any project, or just share those presets with the module when you publish it, then the “getDefault()”/”setDefaults()” function is the solution. These functions read and write into a dictionary that is embedded with the *.m8m module file.
Read data
To read/access the defaults dictionary use the “getDefaults()” function : module.getDefaults()
By default, the module defaults dictionary is blank. The following script: print module.getDefaults() returns {} the “Script Output” window.
It’s more convenient to use a global variable than to use the module defaults dictionary. I recommend you to set the variable name to preferences or “prefs”:
prefs = module.getDefaults()It will be easier to read keys from the “prefs” variable. For instance, if you saved a variable with the key 'preset', you will read it with this syntax: prefs['preset']
Write data
To write data into the defaults dictionary, use the “setDefaults()” function: module.setDefaults(prefs)
There are two ways to write the dictionary for “setDefaults()”:
-
Use a variable to define the dictionary and use the variable reference as the “setDefaults” parameter. For example, to store a preset name you can type:
prefs = {'preset': 'text'} module.setDefaults(prefs) -
Or you can directly define the dictionary between parentheses:
module.setDefaults({'preset': 'text'})
You can save different kinds of data types: list, dictionary, tuple, text string, number and variable reference (which is any of the previous data type), for instance:
myvar = 'hello'
prefs = {'list': [1, 2, 3], 'dictionary': {'key': 'keyvalue'}, 'tuple': (1, 2, 3), 'number': 1.5032, 'text': 'text string', 'variable': myvar}
module.setDefaults(prefs)
print module.getDefaults()
#returns {'dictionary': {'key': 'keyvalue'}, 'tuple': [1, 2, 3], 'text': 'text string', 'list': [1, 2, 3], 'number': 1.5032000000000001, 'variable': 'hello'}
To clear a defaults dictionary, write a blank dictionary as the parameter :
module.setDefaults({})
print module.getDefaults()
#returns {}
17. Store and read data in a project using inDict & outDict dictionaries
All controls have an autoserialize feature. When a project is saved and if the control “autoserialize” attribute is checked, the current position and value is saved with the project to the *.md8 document. Unfortunately, the autoserialize cannot save other data like lists, linked data to a control (for instance a text for a slider) or a list of Filters you applied (without the “Filter” (layer) module).
The only way to save this data is to store it into the “outDict” dictionary from the “Serialize(outDict)” script block and retrieve them from the “inDict” dictionary in the “Deserialize(inDict)” script block.
The “Serialize(outDict)” script is called once when you open a project, the “Deserialize(inDict)” script is called once when the current project is saved. You can store any sort of python data like text, number, list, tuple or dictionary in the outDict. But you can’t store images, fonts or any other media.
To write data to this dictionary, use the “outDict” dictionary:
Go to the “Serialize(outDict)” script block
Into the “outDict” dictionary, type:
outDict['test'] = 'test text string'Save the current project on the desktop as ”testproject”. This project will be saved with the .md8 extension.
To read the saved 'test' key from the testproject.md8 project saved on the desktop, use the “inDict” dictionary:
Go to the “Deserialize(inDict)”.
Display the content of the “inDict” dictionary in the script output window, type:
print inDict #returns {'test': 'test text string', '__AUTO_SERIALIZE': {}}To display the 'test' key value in the script output window, type:
print inDict['test'] #returns test text stringClose the current project or create a new project.
Open the saved document “testproject”.
When you retrieve information from “inDict” to the ”deserialize” script, if the value is not saved, an error may occur. A simple, additional script can prevent this error. Add a condition statement, type:
if 'test' in inDict:
	print inDict['test']
The next example will show how to store the date and time of a project when saved.
Go to the “Init()” script and import required class to read date and time, type:
from time import strftimeGo to the “Serialize(outDict)” script and type:
#record date and time when the project is saved"
#create a key to store date and time - 'LAST_SAVED'
outDict['LAST_SAVED'] = strftime("%d/%m/%y at %H:%M:%S")
Go to the “Deserialize(inDict)” script and type:
#print out the date and time of the current project's last save
if 'LAST_SAVED' in inDict:
	print 'this project was saved on ', inDict['LAST_SAVED']
Save the current module (⌘ ⌥ S) , restart it (⌘ ⌥ R) .
Save the current project to the desktop.
Close the current project or create a new project.
Open the saved project to the desktop, open the script output window (⌘ ⌥ O).
18. Store and read data in Modul8 preferences using getSharedDictionary
“setDefaults()” / ”getDefaults()” and “inDict” / ”outDict” are useful functions and dictionaries to store data within a specific module. A problem occurs when a variable has to be shared between multiple modules: how can you send data to other modules? The solution is the shared dictionary. This dictionary is saved in the *.plist file in the Modul8 software preferences.
For example, the shared dictionary is used by the BPM (master) module and the BPM router (layer) module. The BPM(master) module computes a 'BPM_POSITION' and shares it with the BPM router(layer) module through the shared dictionary. While the BPM(master) module sends the BPM position in the “ElapsedEvent” script to the shared dictionary, the BPM router (layer) module constantly reads the shared dictionary to synchronize layer actions to the current BPM.
Read
To read the shared dictionary, use the following function:
module.getSharedDictionary()For example, to read the BPM position from the shared dictionary (you must run the BPM [master] module at least once), you can read the linked dictionary key for this variable: 'BPM_POSITION'
print module.getSharedDictionary()['BPM_POSITION']It’s more elegant to use a global variable that will refer to the shared dictionary, and thus use it for any dictionary related actions and operations:
sharedDict = module.getSharedDictionary()
print sharedDict['BPM_POSITION']
Write
The “getSharedDictionary()” function is a read and write function. In other words, to write into the shared dictionary, the same function is used. For instance, to store and share a variable called TEST you can type:
module.getSharedDictionary()['TEST'] = 'this is a shared text'Or you can use a variable reference to write to it:
sharedDict = module.getSharedDictionary()
sharedDict['TEST'] = 'this is a shared text'
To browse the content of the shared dictionary and return its key content, type:
for key in module.getSharedDictionary():
	print key
To delete a key in the shared dictionary use the del statement. For instance, to delete the 'TEST' key from the shared dictionary, you can either type:
del module.getSharedDictionary()['TEST']Or, if you used a variable as dictionary reference:
del sharedDict['TEST']Keep in mind that data saved in the shared dictionary is stored on your local system. It is not embedded in a module or in your project file. So you cannot reuse this data on another computer.
19. How to force module controls to resynchronize with Modul8
This function can be used to force all the controls to flush their values from the Modul8 keywords. This keyword can be useful for refreshing the values for example when shutting off the module, so that the data created by your module will not interfere with other modules.
module.flushAllControls()Interact with the visual properties of a module
20. How to show and hide a group
Any visual elements from a module can be grouped together. They can be either controls or shapes or a mixture of both kinds. When elements are grouped they are not physically linked, and there is no hierarchy. Only the name of the group is the link between these elements. A group can be shown or hidden., You cannot browse the content of the group with a script or move or scale the group with a script.
To create a group you can choose between two methods:
- Method 1: select element by element and go to the “Attributes” panel and type a group name (”myGroup” for example). This method is perfect to add a new control or shape to an existing group - otherwise it is really a time consuming process, and you may risk accidentally displacing a visual element.

Figure 97. The slider control is added to the 'myGroup' group. -
Method 2: this technique has two advantages. You can save time and have better control on the group content.
Select elements you want to group, then go to the “Groups” tab in the module toolbox area.
Type the name of the group (”myGroup”, for instance) and click on the “Group” button to group elements with the selected group name.
Figure 98. Multiplie controls and shape are selected and grouped into the 'myGroup' group with the Group tool.
- To hide the group ”myGroup”, type: module.hideGroup('myGroup')
- To show the group ”myGroup”, type: module.showGroup('myGroup')
- To hide the group ”myGroup” except certain elements of that group, type: module.hideGroupExcept('mygroup', ['control'])
The next example will show how to show/hide a group with a toggle button.
Add the elements of the module, and group them with the name ”myGroup”.
Add a button to the module. This button will be used to display and show the group (you can change its text caption to “'show/hide' group”).
Click the “Toggle” checkbox of the button to enable the toggle mode.
Click the “Script Connect” tab and type in “'show'” in the send “Message Text” field. “'show'” is the message used to trigger the visibility of the group on and off.

Figure 99. How to show and hide a group - Method 2 - step4. Go to the “MessageEvent(msg,param)” script block. When the toggle button is pressed (orange), the group visibility will be turned on. When the toggle button is depressed (blue), the group will be hidden. Type:
if msg == 'show':
	if param['value'] == 1:
		module.showGroup('myGroup')
	else:
		module.hideGroup('myGroup')
Restart the module (⌘ ⌥ R) and click the toggle button to show or hide the group.
Sometimes it might be useful to hide only selected elements of a group. For that, use the module.hideGroupExcept(groupName0, [controlName]) function.
For example, if you have three controls named 'A', 'B' and 'C', and A, B, C belong to the same group named ”myGroup” and you want to hide only A and C, type:
module.hideGroupExcept('myGroup', ['B'])The second argument of the hideGroupExcept is a list. This is a list of text strings. Each element from this list must be a control name (which you set in the attribute name field).
About the setAttribute/getAttribute module function
All visual elements of a module including any shape that has common attributes like the width, height, x position, y position and visibility have specific attributes. Most controls have the ability to change their “Message Event” name. Some controls have specific attributes related to their specific ability, for instance, the “Media Preview” button can display media, the text list control can populate its list with a list of text strings, and a button’s text caption can change its caption name.
For any of these attributes you can either read or write the values of attributes.
When you want to set an attribute to a control, the script statement will be:
module.setAttribute('controlName',attributeName,value)When you want to read a control’s attribute, the script statement will be:
module.getAttribute('controlName',attributeName)The attribute name can be: 'HIDDEN', 'FRAME', 'CAPTION', 'SCRIPT_MESSAGE', 'SHOW_MEDIA', 'TEXTLIST'
21. How to show and hide a control or shape
To hide a control or shape use the 'HIDDEN' attribute. The 'HIDDEN' attribute is a boolean.
To hide a control or shape, set the 'HIDDEN' property to “True”. You can also use 1 or 1.0 instead of the “True” boolean expression. If you consider a control or shape named ”controlName”, you can use one of the three following script options to hide it:
module.setAttribute('controlName', 'HIDDEN', True)
module.setAttribute('controlName', 'HIDDEN', 1)
module.setAttribute('controlName', 'HIDDEN', 1.0)
To show a control or shape, set the 'HIDDEN' property to “False”. You can also use 0 or 0.0 instead. You can use one of the three following script options to show it:
module.setAttribute('controlName','HIDDEN',False)
module.setAttribute('controlName', 'HIDDEN', 0)
module.setAttribute('controlName', 'HIDDEN', 0.0)
To retrieve the information about the 'HIDDEN' property of a control or shape, use the “getAttribute” function. For instance, to get the 'HIDDEN' attribute of the control named ”controlName”, type:
module.getAttribute('controlName','HIDDEN')This will return a number: 1.0 (the control is hidden) or 0.0 (the control is displayed)
The next example will show how to hide a button with another one and vice versa.
Add two push button controls into the module workspace.
Select the first occurrence of the push button and change the ”Undefined” name attribute to ”button1”, then change its caption to ”button 1” (so it will be easier to identify), and finally click on the “Script Connect” tab button.

Figure 100. How to show and hide a control or shape - step 2. Set the “Send Message” event name to ”hide”. This message will be the same for both push buttons.
Repeat step 2 with the second button. Change the name to ”button2” and the text caption to ”button 2”.

Figure 101. How to show and hide a control or shape - step 4. Set the Send Message of button2 to ”hide”.
Go to the “MessageEvent(msg,param)” script block. Both push buttons have the same message event name ”hide”, so the action will be routed according to the control name. If the control that sends the message is button1, then the script will hide button2, and vice versa.
if msg == 'hide':
	if param['NAME'] == 'button1':
		module.setAttribute('button2', 'HIDDEN', param['value'])
	elif param['NAME'] == 'button2':
		module.setAttribute('button1', 'HIDDEN', param['value'])
By default, when a button is pressed, “param['value']” is set to “1.0”. This is perfect to set up the 'HIDDEN' value. By default, when a button is released, “param['value']” is set to “0.0”.
Restart the module (⌘ ⌥ R).
22. How to change the size and position of a control
If you feel limited with the show/hide group or control, you can go to the next step and rearrange visual elements (position and scale) with the 'FRAME' attribute. It can be useful if you have many controls or shapes and you want to align, scale or distribute them in the module’s workspace.
To set the 'FRAME' attribute, add a list as parameters. This list has four arguments: x, y, width, and height. It is possible to define the list with the setAttribute statement:
module.setAttribute('controlName', 'FRAME', [x, y, width, height])Or you can define a property list with the x, y, width and height values, then apply the list to the setAttribute statement:
list = [x, y, width, height]
module.setAttribute('controlName', 'FRAME', list)
For instance, if your module is a 400x280 pixel module and you want to add a shape named ”shape” as a background that matches the module’s size, type:
module.setAttribute('shape', 'FRAME', [0, 0, 400, 280])Watch out! The module’s x and y origin is at the bottom left corner.
To read a control or shape’s attribute 'FRAME' value, use the “getAttribute” function. For example, for a control named ”control”, type:
module.getAttribute('control', 'FRAME')This will return a list with the four values x, y, width and height.
The next example will show how to read a control’s position and size and copy the value to a shape and add an additional border:
Add a slider control to the module and change its attribute name to ”slider”.
Add a filled rounded corner shape and change its attribute name to ”shape”.
Go to the “Init()” script event block and define a property that reads the slider’s position and size. Type:
prop = module.getAttribute('slider', 'FRAME') #returns a list [x, y, width, height]Set the variable for the dynamic border size. Type:
border = 8Create a blank list named ”shapeprop” with four values to fill the slider’s position and size. This list will be used as shape 'FRAME' property.
shapeprop = [None]*4Fill each “shapeprop” list entry with a calculated expression from the slider pop list and border variable:
#shape's x position = slider x position - border
shapeprop[0] = prop[0]-border
#shape's y position = slider x position - border
shapeprop[1] = prop[1]-border
#shape's width = slider width + border*2 (left and right border)
shapeprop[2] = prop[2]+border*2
#shape's height = slider height + border*2 (up and down border)
shapeprop[3] = prop[3]+border*2
There is an alternative and shorter way to write the last statement into a single list declaration. It’s shorter but harder to read than the full expression:
shapeprop = [(prop[0]-border), (prop[1]-border), (prop[2]+border*2), (prop[3]+border*2)]Set the new position and size for the 'shape' element. Type:
module.setAttribute('shape', 'FRAME', shapeprop)Restart the module (⌘ ⌥ R).
23. How to change the text of text caption control
A text caption control can only display text, a text caption control cannot send any message. Nevertheless it is possible to set or get the text displayed by the text caption with a script.
To change the text caption, use the 'CAPTION' attribute. For instance, to change the text caption ”control” to ”Hello World”, type:
module.setAttribute('control', 'CAPTION', 'Hello World')To read a control’s text caption, use the “getAttribute” function. Type:
module.getAttribute('control', 'CAPTION') #returns a text string24. How to change a button’s text caption
Sometimes, it is very helpful to be able to change a button’s caption. This recipe will show how to set a button’s caption related to its state. Let’s build a play/stop toggle button. When the button is pressed (orange) the caption will display 'PLAY', and when the button is depressed (blue) the caption will display 'STOP'
Add a button and change its name attribute to button. Check the toggle attribute.
Open the “Script Connect” tab and set the send message to ”onToggle”.
Go to the “Init()” script event block and initialize the control button’s caption to ”STOP”:
module.setAttribute('button', 'CAPTION', 'STOP')Go to the “MessageEvent(msg,param)” script block and type:
if msg == 'onToggle':
	if param['value']:
		module.setAttribute('button', 'CAPTION', 'PLAY')
	else:
		module.setAttribute('button', 'CAPTION', 'STOP')
Restart the module (⌘ ⌥ R).
25. How to change the text caption of a checkbox or radio button
Checkbox controls and radio buttons are controls that have the same attributes properties as button controls.
To write a 'CAPTION' attribute of a control, use:
module.setAttribute('control', 'CAPTION', 'new caption text string')To read the caption of a checkbox or radio button control, use:
module.getAttribute('control', 'CAPTION') #returns a text string26. How to change the “send message name” of a control with script
There are two ways to set a Message Event name. The first method is to enter the Message Event name manually in the “Script Connect” tab’s ”Send Message” text field. The other method is to set the Message Event name with scripts.
It is very useful if you want to use the same button to execute different actions through time. For example, you can create a sequence of actions and go to the next step of the sequence each time the button is pressed. The advantage of this technique is that you don’t have to deal with a list or dictionary to get the sequence list and in the “MessageEvent” script it will be easier to focus on the action related to the current message.
To set the “Send Message” event name of a control, type:
module.setAttribute('control','SCRIPT_MESSAGE','newMessage')To get the “Send Message” event name of a control, type:
module.getAttribute('control','SCRIPT_MESSAGE') #returns a text stringThe next example will show how to set a sequence of three messages in the same button and print out a different message each time you press the button.
Add a push button to the module and change its attribute name to ”control”.
Go to the “Init()” script event block. By default, a control has no “Script Connect” message event, but if you added a ”Script Connect” message, it will be overridden by the “Message Event” name defined in the “Init()” script. Let’s set the “Send Message” name for ”control”. Type:
module.setAttribute('control','SCRIPT_MESSAGE','initMessage')Go to the “MessageEvent(msg,param)” script event block. A message is printed out each time the button is pressed, and the script message is changed:
if msg == 'initMessage' and param['value']:
	print 'HEY the message is ', msg, 'sent by ', param['NAME']

	# set the new message. when the button will be pressed again it will trigger 'message_2'
	module.setAttribute('control', 'SCRIPT_MESSAGE', 'message_2')

elif msg == 'message_2' and param['value']:
	print 'Now, the message is ', msg, 'sent by ', param['NAME']

	# set the new message. when the button will be pressed again it will trigger 'message_3'
	module.setAttribute('control', 'SCRIPT_MESSAGE', 'message_3')

elif msg == 'message_3' and param['value']:
	print 'And now, the message is ', msg, 'sent by ', param['NAME']

	# loop back to the first message initMessage
	module.setAttribute('control', 'SCRIPT_MESSAGE', 'initMessage')
Restart the module (⌘ ⌥ R).
27. How to send a message to all instances of the current module
When you create a layer contextual module, each control and action is linked to a specific layer. In other words, each time you select a different layer, displayed controls are controls from the selected instance of the current module for the selected layer. If you want to synchronize a keyword or share information between all layers from all layer sets, you have to talk to every instance of the current module.
The “module.sendMessageToAllInstances(message,param)” function is the solution to send a message with parameters to every layer of the current project.
This function has an interesting feature: it can be called from any script, and thus any script can trigger a Message Event.
If the default parameter sent by a control is a dictionary, the “sendMessageToAllInstances” function can send a wider range of object types and variables.
For instance if you want to send the message without parameters, use “None” as parameter. Type:
module.sendMessageToAllInstances('message', None)All module instances will receive only the message. It can be helpful to send a virtual ”bip” signal to initialize controls or variables.
To send a single value, use the value as a parameter. For instance, to send a message with a floating number:
module.sendMessageToAllInstances('message', 1.5650)For all instances of the module, “MessageEvent” will return:
- msg: 'message'
- param: 1.5650
You can use text strings, numbers, booleans, lists, dictionaries and tuples as parameters.
If you have to send more than one value when a message is sent, enclose data in a container. This container can be either a dictionary, a list or a tuple. For example, if you want to send a list of points, use a list object:
module.sendMessageToAllInstances('message', [p1, p2, p3, p4])To read the “p3” value in the “MessageEvent”, use:
print param[2]The next example will show how to synchronize a button in a layer contextual module. This module will include 2 push buttons and a checkbox button to send the button state to be synchronized. Only one of the two push buttons will be synchronized.
Add the first push button to the module workspace, and change its attribute name to ”A” and caption to ”All”. This button will be synchronized
Add the second button to the module workspace, and just change its caption to ”B” (so it will be easier to identify it).
Add a checkbox control to the module workspace and change its attribute name to ”sendControl” and its Caption to ”send to All”. The control is named like this because its visual state will also be synched with other module instances.
Click on the “Script Connect” tab of the checkbox and set the “Send Message” event name to: ”broadcastMessage”
Open the script editor to the “MessageEvent(msg,param)” script event block. The first condition statement will broadcast the message to all instances that have the checkbox toggle state parameter as param. Type:
if msg == 'broadcastMessage':
	module.sendMessageToAllInstances('message', param['value'])
The second condition statement will parse the message sent by the “sendMessageToAllInstances” function. The retrieved param is to synchronize the ”A” and ”sendControl” controls. Type:
elif msg == 'message':
	module.setValue('A', 0, param)
	module.setValue('sendControl', 0, param)
Restart the module (⌘ ⌥ R) and add layers on the main user interface.
28. How to populate a text list control
You can either populate (add elements) to a text list manually or with the ”TEXTLIST” attribute. This is useful if you want to refresh a list with new data. As mentioned, the text list can only be populated with a list made of text strings. If the list contains data types different from text string, this data will be ignored when the list is parsed. Lists can be defined either with the “setAttribute()” function or outside the function. It’s recommended to define a variable list and use it as a reference in the “setAttribute” function.
To populate a text list control:
Add a text list control to the module workspace and change its attribute name to ”myList”. Then choose text index selection method (click on the ”Text” radio button).

Figure 102. How to populate a text list control - step 1. Go to the “Init()” script event block and define a new variable list named ”list”. This list will be filled with three element types:
#define a list to populate the text control list
list = ['first item','second item','third item']

#populate 'myList' textlist control with variable list
module.setAttribute('myList','TEXTLIST',list)
When a list is filled with the “setAttribute” function, no items from the list are selected. If you want to create a default list selection, use the “setValue” function. To select ”second item” as the default list selection, use index “1”. Type:
#to select an item use the selection attribute
module.setValue('myList','selection',list[1])
Restart the module (⌘ ⌥ R).
29. How to display and trigger media from the mediaset in a module
To display media from the mediaset in the “Media preview” control, use the ”SHOW_MEDIA” control attribute. The ”SHOW_MEDIA” attribute’s index starts at 1 and finishes at 128. However, the range of media ID numbers (the number that is displayed in the upper left corner of the mediaset info panel) goes from 0 to 127. In other words, in order to trigger the media that has the media ID number “0” with “SHOW_MEDIA”, you actually need to type the number “1” or “(0+1)”.
To set the media preview’s media display, use:
module.setAttribute('control name', 'SHOW_MEDIA', idnumber) To get the ”SHOW_MEDIA” attribute id, use:
module.getAttribute('control name', 'SHOW_MEDIA') #this will return a number
Use this memo when you want to perform a script action.
SHOW_MEDIA attribute = media information media ID +1
SHOW_MEDIA = 'ctrl_layer_media'+1
The next example will show how to use a slider control to change the media preview display. The slider control will display media from mediaset 1 and 2. Mediaset 1 media indexes go from 0 to 15 and mediaset 2 media indexes go from 16 to 31. When the media preview is pressed, the media displayed on the control will be sent to the current layer.
Add a media preview control to the module workspace and change its attribute name to ”media”.
Click on the “Script Connect” tab and set the “Send Message” event name to ”trigger”.
Add a slider control to the module workspace and change the “max” attribute to “31”. If you want to display only media from the first mediaset, set the ”max” attribute to “15”.
Click on the “Script Connect” tab and set the “Send Message” event name to ”selectMedia“.
Go to the “Init()” script event block and initialize a variable mediaID that defines which media ID to trigger. The variable will be initialized with the first media from mediaset 1, then display the media in the media preview control. Type in:
mediaID = 0 #the mediaID will use the same index as media ID information

#initialize the view of the media control preview.
module.setAttribute('media', 'SHOW_MEDIA', (mediaID+1))
Go to the “MessageEvent(msg,param)” script event block. When the slider sends the message, its value updates the mediaID variable and uses it to update the preview control:
#the slider control sends the 'selectmedia' message
if msg =='selectMedia':
	#the param returns a float number between 0.0 and 31.0
	# int() will convert the float number to integer
	mediaID=int(param['value'])

	#the media preview control use media ID index + 1
	module.setAttribute('media','SHOW_MEDIA',(mediaID +1))

#the media preview control sends the 'trigger' message
elif msg == 'trigger':
	#use the mediaID variable to send the media to the current layer
	Modul8.setValue('ctrl_layer_media',mediaID,0)
Load media into the mediasets (videos or images), then restart the module (⌘ ⌥ R).
How to communicate with the Modul8 interface and functions
When you want to send or get a message outside of a module, you will need to use modul8. This allows you to communicate directly with the Modul8 interface. Keywords can be represented as a hierarchy. For instance, ctrl_master_speed is the keyword that controls the master speed slider control. This keyword structure is split into three parts: ctrl_ means that this keyword controls the Modul8 user interface controls, master_ means that this control is related to a master control of the main Modul8 user interface, and finally speed, means that the master control is related to the master speed control.
Most Modul8 keywords are read/write but some of them are read only. To get a comprehensive list of keywords and get information about them, use the “Keyword Browser” from the menu “Modules” > “Keyword Browser” or use the keyboard shortcut (⌘ ⌥ B).
The keyword browser automatically represents the hierarchical structure of the keywords. For example, if you click on ”direct” you can see all the direct keywords, and so on. When you select a keyword you can see its description at the bottom of the window. The browser can also be used to insert a keyword into a script or into a user-interface builder.
There are three categories of keywords:
- ctrl_ Control keywords modify controls of the main user interface of Modul8. They modify the user interface and then override manual control. Every control keyword starts with ”ctrl_”.
- direct_ Direct keywords directly modify a parameter of the Modul8 software and automatically resolve conflicts of several modules accessing the same keyword. The direct keywords always begin with ”direct_”. Direct keywords don’t have any representation in the main user interface.
- info_ Information keywords are read only and return information about the project, media, layer, etc.
30. How to send value to a Modul8 keyword with setValue
Most Modul8 keywords only accept float numbers from 0.0 to 1.0. The “Modul8.setValue()” function is used to pass orders to Modul8.
modul8.setValue(keywordname, value, layer)The function works with three arguments: the keyword name that you can get from the keyword browser (⌘ ⌥ B), the value you want to pass to the function (most of the time a float number), and the targeted layer. For example, this script sets the transparency of layer 3 to 50%:
modul8.setValue('ctrl_layer_alpha', 0.5, 3)There are three types of layer targets:
| Target type | Layer Value | Layer target | Example |
| Active Layer | 0 | The selected layer represented by an orange square outline. | modul8.setValue('ctrl_layer_alpha', 0.5, 0) |
| Single Layer | from 1 to 10 | Only one layer among ten layers (1-5 -> group A, 6-10 -> group B) | modul8.setValue('ctrl_layer_alpha', 0.5, 6) |
| All Layers | -1 | All visible and existing layers including disabled layers. | modul8.setValue('ctrl_layer_alpha', 0.5, -1) |
When you set the target to “All Layers” modul8.setValue(keywordname, value, -1), only existing visible layers can receive the order. Layers from other layersets won’t receive the information. To send a message to all layers in all layersets, use the “sendMessageToAllInstances()” function instead.
31. Retrieve information/get value from a Modul8 keyword with getValue
It’s very useful to retrieve information from Modul8, especially when you work with information or direct keywords that do not provide visual feedback. There are many situations where you will need to get Modul8 keyword values. For instance, if you want to increment or interpolate a value, you will need to get the keyword’s value. You might need to get the value of a keyword to compare it with a variable or another keyword value.
To get the value of a keyword, use the “Modul8.getValue()” function. Just point at the layer and ask for the keyword, and it will return the value.
modul8.getValue(keywordname, layer)For instance if you want to get the value of the transparency of layer 3, the syntax will be:
modul8.getValue(‘ctrl_layer_alpha’, 3)As with the “setValue()” method, you can select different layers as targets:
| Target type | Layer value | Layer target | Example |
| Active Layer | 0 | The selected layer represented by an orange square outline. | modul8.setValue('ctrl_layer_alpha', 0) |
| Single Layer | from 1 to 10 | Only one layer among 10 layers (1-5 -> group A) (6-10 ->group B) | modul8.setValue('ctrl_layer_alpha', 6) |
| All Layers | -1 | All visible and existing layers including disabled layers. | modul8.setValue('ctrl_layer_alpha', -1) |
When you get values from “All Layers”, the returned value is a list of ten values. If the layer does not exist, the index value returned will be ”None”.
For example, use this feature if you have a project with only 3 displayed layers, each with different transparency values (100% for layer 1 , 31% for layer 2 and 56% for layer 3), and you want to store or perform a value transformation for the displayed layers. It will be less time consuming than a loop to get all the values. Type in:
print modul8.getValue('ctrl_layer_alpha', -1)
#this will return: [1, 0.31, 0.56, None, None, None, None, None, None, None]
With the same example, if you want to divide all values by 2 you can write:
list = modul8.getValue('ctrl_layer_alpha', -1)
print list
#returns [1, 0.31, 0.56, None, None, None, None, None, None, None]
for i, item in enumerate(list):
	if item is not None:
		list[i] = item/2.0
print list
#this will print out [0.25, 0.155, 0.28, None, None, None, None, None, None, None]Keep in mind that if you don’t master values you retrieve , some computing errors can occur when you try to divide integer numbers.
For instance, in the previous example, the returned list’s first element was the integer 1.
In this phrase, list[i] = item/2, the result of 1/2 is a clipped integer result: 0 .
To avoid this kind of error you can either force the number type to a float number list[i] = float(item)/2 or use a float number as a divider list[i] = item/2.0
32. Convert color space values, convert RGB to HSB and vice versa
Sometimes it’s easier to work in the HSB (hue/saturation/brightness) color space than the RGB (red/green/blue) color space, or vice versa. “rgbToHsb()” and “hsbToRgb()” are in-place convert functions that convert color component list values. In other words, functions read and write inside a predefined list of three values. Values will be converted to the destination color space values and saved in the same list object. If list=[red,green,blue] after HSB conversion, list values will be changed to [hue,saturation,brightness].
color = [1,1,1] #for instance a list with a white color in rgb colorspace
print color #returns [1,1,1]

modul8.rgbToHsb(color)
print color #returns [0.0, 0.0, 1.0] - brightness is set to 100%
Keep in mind that the color list must be defined before you call the “rgbToHsb”/”hsbToRgb” functions!!!
33. How to add filters to a layer with setFilters/getFiltersDesc functions
Besides filters that can be applied from the main interface in the pixel FX area (contrast, saturation, lightness, noise etc.), Modul8 also supports CoreImage and FreeFrame filters (more info at www.freeframe.org).
In the main Modul8 interface, effects from the pixel FX area are processed given a specific order:
Saturation > lightness > contrast > luma key > noise > blur. By default you can’t change the effect order like in the following example: blur > contrast > saturation > lumakey.
The final result of an effect chain will depend on the effect chain order, so you might want to be able to change the effect order. You can do this with the “setFilters()” function.
The “setFilters()” function has the ability to order and apply any filter within the installed filter list. For instance, it is used in the “Filter (layer)” module.
You can get a comprehensive list of installed filters including CoreImage and FreeFrame filters with the “getFiltersDesc()” function. When the function ...
modul8.getFiltersDesc() ... is called, it returns a list of filters. Each filter from the getFiltersDesc list is a dictionary. For instance, the Modul8 “Contrast” filter structure looks like this:
{‘FILTER’: ‘(M8) Contrast’,‘PARAMETERS’:[{‘DEFAULTVALUE’: 0.0, ‘TYPE’: ‘BOOLEAN’, ‘NAME’: ‘Boost’},{‘DEFAULTVALUE’: 0.0, ‘TYPE’: ‘BOOLEAN’, ‘NAME’: ‘Invert’},{‘DEFAULTVALUE’: 0.5, ‘TYPE’: ‘STANDARD’, ‘NAME’: ‘Level’}]}Another example - the CoreImage “Zoom Blur” filter structure looks like this:
{'FILTER': '(CI) Zoom Blur', 'PARAMETERS': [{'NAME2': 'Center Y', 'DEFAULTVALUE': 0.5, 'TYPE': 'XYPOS', 'NAME': 'Center X', 'DEFAULTVALUE2': 0.5}, {'DEFAULTVALUE': 0.2, 'TYPE': 'STANDARD', 'NAME': 'Amount'}]}Each of of these filter dictionaries is made up of two main keys: 'FILTERS' and 'PARAMETERS'.
-
'FILTERS' key value is the name of the filter. This key name begins with a parenthesis and a couple of capital letters that tell if it’s a Modul8 filter (M8). CoreImage filter (CI) or Freeframe filter (FF).
If you want to print out the list of all available filters in Modul8, you can type:filterlist = modul8.getFiltersDesc() for i, item in enumerate(filterlist): print item['FILTER'] -
'PARAMETERS' key value is a list of parameters needed for using the filter. Each argument from the parameters list is a dictionary. According to the type of filter, the PARAMETERS argument value list can contain one or multiple arguments. It will depend on the number of options and parameters for a single filter.
For example, the (M8) Contrast filter dictionary has three arguments that you can identify in the main interface, the Boost, Invert and level. Each parameter argument is a dictionary including three types of keys:
- DEFAULTVALUE: a float number that defines the default value to apply if the value is not modified.
- NAME is the name of the parameter. It describes the property of an option (for instance boost, invert, level, etc.). This property will be used as a parameter key when you apply a filter.
-
TYPE defines the type of parameter. The parameter type is different from the Python script type. Returned values are text strings that help to identify the best control type to use, display or set parameters.
Parameter types are: STANDARD, TEXT, BOOLEAN, RED, GREEN, BLUE, ALPHA, XYPOS. - XYPOS means that the parameter returns or uses two sub values. For example, a pad control will be easier to connect to values returned by this parameter. In other words this property type will use two different properties defined by keys NAME and NAME2.
for i, item in enumerate(filterlist):
	print i, ':' , item['FILTER'], 'params:', item['PARAMETERS']
To apply filters to a layer use the “setFilters()” function. The structure of the “setFilters()” function is:
modul8.setFilters(filterList,layer,False);The “filterList” contains the list of the filter you want to apply. If you plan to apply only one filter you simply create a list with one entry. Any filter from the “filterList” has to be structured with the 'FILTER' and 'PARAMETERS' keys.
It will be easier to use a variable that defines the filter you plan to apply, especially if you want to experiment with filter order or if you want to reuse the same effect in the same effect chain. For example, you can have a filter sequence such as blur > contrast > key > blur or contrast > blur > key > contrast, etc.
To, for example, define a 50% contrast value filter with “Boost” and “Invert” disabled, type in:
contrastDict = {'FILTER': '(M8) Contrast', 'PARAMETERS': {'Boost':False, 'Invert':False, Level:0.5} }The filter description is a little bit different from the filter dictionary structure returned from the “Modul8.getFiltersDesc()” function. 'PARAMETERS' key values are no longer a list of arguments but a dictionary in which each key name entry is built from the 'NAME' key property. In the previous example the (M8) contrast parameter in the read statement, which was ...
PARAMETERS’:[{‘DEFAULTVALUE’: 0.0, ‘TYPE’: ‘BOOLEAN’, ‘NAME’: ‘Boost’}, {‘DEFAULTVALUE’: 0.0, ‘TYPE’: ‘BOOLEAN’, ‘NAME’: ‘Invert’}, {‘DEFAULTVALUE’: 0.5, ‘TYPE’: ‘STANDARD’, ‘NAME’: ‘Level’}]... is turned into a single dictionary with less parameters:
'PARAMETERS': {'Boost':False, 'Invert':False, Level:0.5}To send this filter to a specific layer, type in:
modul8.setFilters([contrastDict], layer, False)The last parameter is ignored. You should simply type in “False”.
To apply several filters to a layer, chain filters dictionaries in the filter list, the setFilters structure will be
modul8.setFilters([effect_1,effect_2,...], layer, False)For instance, if you want to add a blur filter to the contrast filter, the layer list will look like this: [contrast,blur]. Type:
blurDict = {'FILTER': '(CI) Gaussian Blur', 'PARAMETERS': {'Radius':0.2} }
modul8.setFilters([contrastDict,blurDict], layer, False)
If you want to remove filters, use an empty list as filterList. For example, to remove filters from the active layer, type in:
modul8.setFilters([], 0, False)Bear in mind that it will remove only filters set with the “setFilters()” function. Effects that are set with controls from the main user interface won't be reset because these pixel effects are driven by Modul8 keywords. Their keyword name root is 'ctrl_layer_pixelFX_'
34. How to draw and send the drawing to a layer
There are several ways to use the draw preview control. You can use it to draw and create custom controls or you can use it as a custom monitoring tool. For instance, if you want to monitor audio waveforms, or use it as a canvas and send its contents to a layer. The link between these different usages is the script. Scripts are needed to display content in the draw view control and thus send its content to a layer. This control is a little bit more complicated and it is a powerful feature.
The process of drawing is a stepped order process. You must complete it to display a drawing in either the control or the layer.
To summarize the process :
- STEP 1: DRAW
- STEP 2: FINISH DRAWING
- STEP 3 (optional): SEND THE DRAWING CONTENT TO A LAYER
For example, here’s a sample script that draws an outlined rectangle into the draw view control ”draw” and displays it in the active layer with the layer reference name “my first work”:
module.frameRect('draw',0,0,20,150,1,1,1,1) #step 1
module.finishDrawings('draw') #step 2
module.sendContentToLayer('canvas','my first work',0) #step 3
This script displays a white rectangle of 20 px width and 150 px height located on the bottom left corner of the draw view control. This script has three lines. The first line defines the parameters and object type to be drawn.
The second line tells the script to finish drawing and render it onto the control. Use module.finishDrawings(controlName) to end the drawing process.
The third and last line sends the drawing to a layer. This function, “module.sendContentToLayer(controlName,drawingName,layer)” has three parameters. The “drawingName” is the displayed reference name for the canvas’ special media. It helps to identify the displayed work.
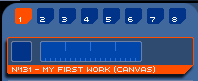
There are three types of drawings: shapes, text and bezier curves.
Coordinates origin:
Keep in mind that the origin of the control is located on the bottom left corner of the control. Use this corner as a reference to set up the x offset and y offset for any object you draw.

Draw simple shapes
You can draw different types of shapes:
- Filled rectangle: module.paintRect(controlname,x,y,width,height,red,green,blue,alpha)
- Outlined rectangle: module.frameRect(controlname,x,y,width,height,red,green,blue,alpha)
- Filled oval/circle: module.paintOval(controlname,x,y,width,height,red,green,blue,alpha)
- Outlined oval/circle: module.frameOval(controlname,x,y,width,height,red,green,blue,alpha)
- Line: module.drawLine(controlname,x1,y1,x2,y2,thickness,red,green,blue,alpha)
- Filled arc: module.paintArc(name,x,y,radius,startAngle,endAngle, red,green,blue,alpha)
- Outlined arc: module.frameArc(name,x,y,radius,startAngle,endAngle, red,green,blue,alpha)
Let’s draw different shapes on a draw view control:
Add a draw view control to the module and ensure that the control will be large enough to display drawings. For the following example, the draw view control is 300x180 pixels. Then change its attribute name to ”canvas”.
Go to the “Init()” script event block. Let’s start with a filled rectangle located 5 pixels from the left and 10 pixel from the bottom of the control. The x position value will be 5, y position 10. It will be a rectangle that is 6 pixels in width and 50 pixels in height. The color will be red. Therefore, red = 1.0, green = 0, blue = 0 and the opacity will be 100%, so we will set the alpha = 1.0. Type in the following:
module.paintRect('canvas', 5, 10, 6, 50, 1, 0, 0, 1)
#Finish drawing
module.finishDrawings('canvas')
Restart the Module (⌘ ⌥ R) .
Now let’s add an outlined rectangle in the same control. It will be a green rectangle of 10x100 pixels, positioned at x=15, y=10.. To define the rectangle’s parameters, let’s use an alternative method using variables:
x = 15 #x position
y = 10 #y position
w = 10 # width
h = 100 #height
r = 0 #red
g = 1 #green
b = 0 #blue
a = 1 #alpha

module.frameRect('canvas', x, y, w, h, r, g, b, a)
module.finishDrawings('canvas')
Next, let’s add a filled and outlined circle of 100 pixels in diameter at position x=0, y=20. The circle is filled with white and its transparency is set to 50%, and the outline color will be yellow. A variable will be used to define the circle’s diameter since the width and height are the same. Type in:
d = 100 #circle diameter
module.paintOval('canvas', 0, 10, d, d, 1, 1, 1, 0.5)
module.frameOval('canvas', 0, 10, d, d, 1, 1, 0, 1)
module.finishDrawings('canvas')
Restart the Module (⌘ ⌥ R). The semi transparent circle is overlaid.
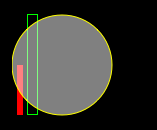
Figure 105. Draw simple shapes - step 6 - The semi transparent circle is overlaid. Now, let’s add a line. The line shape is different from the rectangle or oval shape. To define a line you have to set up two points, a starting point (x1,y1) and a ending point (x2,y2), then specify the thickness of the line and the color.
Let’s create a 4 pixel thick, blue line. This line will begin at the bottom left corner of the control and finish at the upper right corner of the module.
First, let’s get the size of the current module. The 'FRAME' attribute will return a list [x y, width, height] and store the return width and height as the destination point coordinates.size = module.getAttribute('canvas', 'FRAME') x1 = 0 y1 = 0 x2 = size[2] y2 = size[3] module.drawLine('canvas', x1, y1, x2, y2, 4, 0, 0, 1, 1) module.finishDrawings('canvas')Restart the module (⌘ ⌥ R).
Now let’s add an arc. The arc shape is a circle that can only be partially drawn. You can get a part of a circle and display it like a pie chart. The arc shape is defined by an initial position point, a radius size , a start angle value (in degrees), an end angle value. and a color. Let’s add a filled quarter of a white circle positioned at x=50, y=30 with a radius for the complete circle of 150 pixels.
The start angle origin is located at the top of the circle and its angle is calculated clockwise. The angle is defined in degrees, from 0.0 to 360.0.
To create a quarter circle, type in:radius = 150 startAngle = 0 endAngle = 90 module.paintArc('canvas', 50, 30, radius, startAngle, endAngle, 1, 1, 1, 1) module.finishDrawings('canvas')Restart the module (⌘ ⌥ R). If you want to have only the outlined version of the quarter circle, replace paintArc with frameArc.
Draw text caption
You can also add text string to a drawing. Unlike the text media, you can only set the text value and color. This text string feature can be useful to add a caption to a drawn control or add a visual feedback for a value. The structure to create a text caption in a draw view control is
module.drawString(controlName, string, x, y, red, green, blue, alpha)Let’s create a medium grey 'hello, world' text string located at position x= 20, y= 30. To create a grey color the red, green and blue color must have the same value. For a medium grey, use 0.5 as color value.
Add draw view control and change its name attribute to 'canvas'
Go to the ”Init()” script event editor block and type:
module.drawString('canvas', 'Hello, world', 20, 30, 0.5, 0.5, 0.5, 1)
module.finishDrawings('canvas')
Restart the module (⌘ ⌥ R).
Draw bezier curves
If you need to create more complex line shapes with multiple points, you can use bezier curves. If you are not familiar with this kind of curve, you can think of bezier curves as a graph drawing process. For instance, imagine you have to sketch a graphic on graph paper. First, you have to select a starting point as a reference, and then you add points to the graph each time you want to add a new section of your curve. When you are done with the graph you get a ruler and a pen (with a color and thickness) and you join defined points from the starting point. When you are done with the drawing, you can get rid of the pen, ruler and all instruction and look at the result.
The script process can be summarized in six steps:
- STEP 1: CREATE BEZIER CURVE
- STEP 2: MOVE TO THE STARTING POINT
- STEP 3: ADD POINTS TO THE DRAWING SEQUENCE
- STEP 4: SET THE DRAWING STYLE/RENDER CURVE
- STEP 5: FINISH DRAWING
- STEP 6 (optional): SEND THE DRAWING CONTENT TO A LAYER
The next example will show how to create a triangle with the bezier curve:
Add a draw view control to the module and change its attribute name to ”canvas”.
Go to the ”Init()” script editor block. Let’s start with the bezier curve definition and create a new curve in the module with the “module.bezierNew(controlName)” function. Type in:
module.bezierNew('canvas')Set the starting point of the curve. Each time you want to move to a new position without drawing, use the “module.bezierMoveTo(controlName,x,y)” function. It can be useful to add blank sections of a curve. In this example, let’s set the x position to 50 and y position to 20. Type in:
x0 = 50
y0 = 20
module.bezierMoveTo('canvas', x0, y0)
Add the first point to the triangle shape. The first point will be 100 pixels to the right of the starting point and 100 pixels higher. Type in:
x1 = x0+100
y1 = y0+100
module.bezierLineTo('canvas', x1, y1)
Now the next x point will be 100 pixels to the right of the previous point and the y point will be located at the same height of the initial point. Type in:
x2 = x1+100
y2 = y0
module.bezierLineTo('canvas', x2, y2)
To close the triangle, the starting point will be used as the last point, so type in:
module.bezierLineTo('canvas', x0, y0)It’s time to render the triangle. The “module.bezierDraw(controlName,thickness,capStyle,red,green,blue,alpha)” function can set the size/thickness of the line, its color and its cap-line style. There are three types of cap styles: 'ROUNDLINE', 'BUTTLINE', and 'SQUARELINE'. You can see the difference on the cap-line style if it’s an opened curve. Otherwise it looks the same. In this example, let’s render the triangle with a 3 pixel wide white line in a 'BUTTLINE' cap style, so type in:
module.bezierDraw('canvas', 3, 'BUTTLINE', 1, 1, 1, 1)Now let’s render the line and display it in the control. Type in:
module.finishDrawings('canvas')Send the white triangle to the active layer and name the creation ”white triangle”. Type in:
module.sendContentToLayer('canvas', 'white triangle', 0)Restart the module (⌘ ⌥ R).
Drawing on multiple layers
Each draw view control may contain one or more layers. By default only one layer is active. However, sometimes it is useful to create a background and then draw to a layer in front without having to completely rebuild the drawing.
To select a new layer, call this function:
module.setDrawingLayer(controlName, drawingLayerName)It is up to you to choose a name for every layer you plan to use. If you call this function and the layer does not exist, it will be created. Once a layer has been selected all the drawings are drawn, executed and displayed in it.
Erase a drawing
In addition to being able to create drawings, it is also possible to erase them using scripts.
- To enter the erase mode: use “module.enterEraseMode(controlName)” function.
- To exit the erase mode: use “module.exitEraseMode(controlName)” function.
- To clear all drawings from a drawing layer: use the “module.ClearDrawings(controlName)” function. Of course, if you work only in a single drawing view, the whole current drawing will be erased in a single action script.
Create an animation
It’s possible to send and store drawings to a frame stack and call back saved frames to display them, and thus animate those drawings, if you call different frames from the “frameStack” within the “Elapsed” script event block.
To add a frame and set content to this frame, use:
module.addContentToFrameStack(controlName)
This function will add the current content of the view to the frame stack. This is an invisible action. The draw view has an internal frame list where the content is stored.
The only way to access stored elements from this internal list is to display the content of a specific frame to a Modul8 layer with the function:
module.sendFrameToLayer(controlName, workName, layer, frame)This function works exactly like the “sendContentToLayer” function. The only difference is that instead of sending the content of the control to the layer it sends frame content from the frame stack. You pass the frame number starting at zero for the first frame.
To delete a specific frame of the frame stack list, enter the frame number you want to delete using the function:
module.removeFrame(controlName, frame)Finally if you want to clear the frame stack entirely and remove all frames, use the function:
module.removeAllFrames(controlName)Watch out! There is no function to get the number of frames you added to the layer stack. If you want to go to a specific frame, ensure that you create a variable that stores the number of frames in your frame stack.
Interactivity with the draw view control
To create an interactive draw view it is necessary to allow your script to receive mouse input. First of all you have to define a script message in the ”Script Connect” tab. Then, when you click and drag the mouse on the control, the control will send a message to “MesssageEvent(msg,param)” script. In the “param” dictionary you find an 'ACTION' keyword that describes the type of action. The output value can be:
- 'MOUSEDOWN': The mouse button has been pressed in the draw view control
- 'MOUSEUP': The mouse button has been released
- 'MOUSEDRAGGED': The mouse has been dragged
For each of these messages you will also receive the mouse position in “X” and “Y” coordinate entries inside the “param” dictionary.
Working with external devices or data
35. How to bind an audio band to a keyword
Modul8 has a keyword to get the sound level input: Modul8.getValue('direct_soundInputLevel',0). This sound level is not precise. A new feature in version Modul8 2.6 is “Sound Analysis”. You can configure returned bands with the sound analysis configuration window (⌘ ⌥ A). You can parse this sound data with the function:
modul8.getSoundBands()This function returns a tuple of 23 values. Each tuple entry is linked to a sound band.
The first 20 values are independent sound band values:
- Tuple index from 0 to 9 returns Left Channel bands.
- Tuple index from 10 to 19 returns Right Channel bands
Independent sound bands are between a range of 31Hz to 16Khz
Three other values are calculated bands. You can set an average calculation using a band selection in the sound analysis configuration window.
- 20 is the tuple index for low range sounds values
- 21 is the tuple index for mid range sounds values
- 22 is the tuple index for high range sounds values
For example, to get the mid range sounds value, use index 21. You can either call the value with the function ...
print modul8.getSoundBands()[21]... or use a variable to store bands ...
soundband = modul8.getSoundBands()
print soundband[21]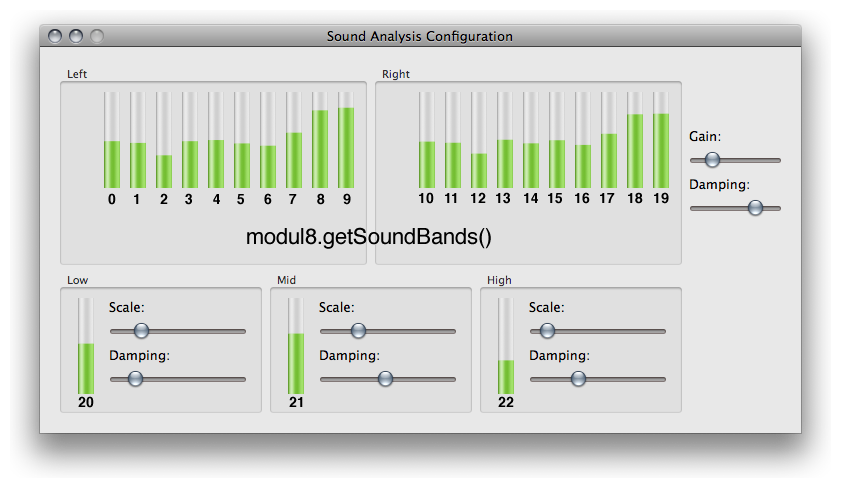
The next example will show you how to bind the mid sound band to the current layer. Before you start this exercise, ensure that there is a sound source and the sound level input is not set to 0.0. Open the sound analysis configuration window. If everything is fine, you should see green bands moving.
Go to the “Periodical(elapsed)” script event block. It’s necessary to write the script in this script block if you want to synch the audio band to the layer displayed. As seen previously, the mid sound band index is 21. Type in:
mid = modul8.getSoundBands()[21]
modul8.setValue('ctrl_layer_rotation_z', mid, 0)
Restart the module (⌘ ⌥ R).
An alternative way is to use the “direct_ family” keyword. With this keyword you can keep control of the Z rotation knob control and easily adjust the range of rotation (“direct_layer_rotation_z” goes from “- infinite” to “+ infinite”. It’s very handy if you set the layer target to “All layers” (-1), because for each layer you can combine the rotation from the direct keyword and have a contextual rotation for each layer.
This example will constrain the rotation to 180 degrees and use all layers as a target.
mid = modul8.getSoundBands()[21]
modul8.setValue('direct_layer_rotation_z', mid*180, -1)
36. How to send a MIDI event to a device
Modul8 can send MIDI messages to a midi controller. There are two kinds of MIDI devices, virtual midi devices like the MIDI IAC (Inter Application Communication) which is a hub to send and receive MIDI between two applications, and hardware devices.
Modul8 can connect different MIDI devices on the same computer. For example, you can have a configuration with multiple MIDI controllers such as a motorized MIDI Controller like the Berhringer BCF2000, a Korg Nano Kontrol , a M-Audio Trigger Finger and a virtual IAC Bus to synchronize MIDI with Ableton Live. When you plug in a new MIDI device, Modul8 updates the device list. To display the list of MIDI devices connected to Modul8, use the function:
modul8.getMidiDestinationsList() For the previously described MIDI device configuration, the “getMidiDestinationsList()” function will return a list like:
[u'Gestionnaire IAC - Bus 1', u'USB Trigger Finger - USB Trigger Finger', u'nanoKONTROL - CTRL', u'BCF2000 - BCF2000']This function returns a list of device names. This list is important because the index of the device from this list or the returned device name is needed to set the MIDI device message destination. To print out the list of devices with the device index, type:
for i, item in enumerate(modul8.getMidiDestinationsList()):
	print i ,': ',item
This script will return:
0 : Gestionnaire IAC - Bus 1
1 : USB Trigger Finger - USB Trigger Finger
2 : nanoKONTROL - CTRL
3 : BCF2000 - BCF2000
The function to send a MIDI message is:
modul8.sendMidi(deviceID, channel, message, param1, param2)The “deviceID” is either a text string with the name of the device that should receive the message, or an integer that is the index of the device from the getMidiDestinationsList.
For instance, in the previous example, the Behringer BCF2000’s name is 'BCF2000 - BCF2000' and its integer index is 3.
The message can be either a direct numerical message or a string. String messages can be: NOTE_OFF, NOTE_ON, POLY_AFTERTOUCH, CONTROL_CHANGE, MODE_CHANGE, AFTERTOUCH, PITCHBEND and SYSTEM.
The param1 and param2 are MIDI values. Depending on the device’s message type, values can be different. To know the correct message name of the param1 or param2 values, you can either use the “printDirectEvent V2 (Tool)” module from the GarageCUBE online library and check the MIDI button to monitor MIDI values from external devices. Or you can go to the “DirectEvent(type,param)” script event block and print out MIDI messages with the following script:
if type == 'MIDI':
	print param

#will return for example:
# {'timestamp': 44.5, 'channel': 1, 'param1': 81, 'message': 'CONTROL_CHANGE', 'rawEvent': 176, 'param2': 96}
If you want to print only the message and its associated parameters:
if type == 'MIDI':
	print param

#will return for example:
#message: CONTROL_CHANGE param1 = 81 param2 = 96
In the last example, when the first slider is tweaked, the value param1 remains the same: 81, whereas param2 is changing. It’s easy to understand that param1 is the slider control id and param2 is the MIDI value. Previously with the “getMidiDestinationsList()” function, we retrieved the index and name of the BCF2000 MIDI device.
With this information it’s easy to set the first slider of the BCF2000 to its maximum value (127). You type either:
modul8.sendMidi(3, 1, 'CONTROL_CHANGE', 81, 127)
#3 -> integer for the midi device
or
modul8.sendMidi('BCF2000 - BCF2000', 1, 'CONTROL_CHANGE', 81, 127)37. How to retrieve MIDI messages
Even if you have several MIDI controllers linked to a computer, they all send the same type of MIDI message and they all use the same range of MIDI values (0 to 127). There is no way to know the name of the MIDI controller that sent the MIDI message. When a device sends a MIDI message, the message is received by Modul8 in the “DirectEvent(type,param)” script event block. The parameter type returns a different string name. To get only the MIDI messages the type must be equal to 'MIDI'.
The returned MIDI message is a dictionary. For example, if a midi note is received, the MIDI message will look like:
{'timestamp': 220.0, 'channel': 10, 'param1': 43, 'message': 'NOTE_ON', 'rawEvent': 153, 'param2': 71}MIDI values are stored in param1 and param2 keywords. Depending on the message type (see recipe 36), retrieved param values can be different.
To bind a Modul8 keyword to a specific MIDI message, use a comparison script. For instance, if you want to listen to the MIDI control change message type of channel 10 for a slider control, and its ID is 30, and then send the result to the “ctrl_master_alpha” Modul8 keyword:
Go to the “DirectEvent(type,param)” script event block and type in:
if type == 'MIDI':
	#check if midi channel is 10
	if param['channel'] == 10:
		#check if the message is ok and if the control is the slider (id = 11)
		if param['message'] == 'CONTROL_CHANGE' and param['param1'] == 11:
			#param['param2'] returns an integer from 0 to 127
			#a convert midi value, create a local variable value
			value = param['param2']/127.0 # the applied value is now a float between 0.0 and 1.0

			modul8.setValue('ctrl_master_alpha', value, 0)
Restart the module (⌘ ⌥ R).
It’s very important to convert the MIDI value to the required range and type of value for the Modul8 keyword. The MIDI value is an integer. Use this formula to convert the MIDI value to a float between 0.0 and 1.0
value = midivalue/127.0
38. How to do an action with a custom keyboard shortcut
The “DirectEvent(type,param)” script event block can retrieve Keyboard shortcuts. The type variable can return two different values for a keyboard action.
- 'KEYDOWN' is the returned type when a key is pressed.
- 'KEYUP' is the returned type when a key is released.
When a key is pressed or released , the keystroke is stored into the “param” dictionary. This dictionary contains a sub dictionary defined by the key ”modifiers” and another key named ”key”. The returned dictionary looks like this:
{'modifiers': {'CONTROL': 1, 'SHIFT': 0, 'ALT': 0, 'COMMAND': 0}, 'key': 'RETURN'}The “modifiers” keyword is a dictionary that contains keystroke booleans. These are modifiers keys. When you push one of the modifier keys, the value turns to 1. You can use these modifiers keys to perform a keyboard shortcut conditional action.
The ”key” keyword returns the pressed or released keystroke.
The next example will show how to create a shortcut for the key press event and another one for the release key event.
Shortcuts will respond to SHIFT+Right Arrow key.
if type == 'KEYDOWN':
	#the statement is true only if all conditions are completed
	if param['modifiers']['SHIFT'] == 1 and param['key'] == 'RIGHTARROW':
		print 'PRESS SHORTCUT!! SHIFT + right arrow pressed'

elif type == 'KEYUP':
	if param['modifiers']['SHIFT'] == 1 and param['key'] == 'RIGHTARROW':
		print 'RELEASE SHORTCUT!! SHIFT + right arrow released'
About DMX and Modul8
The DMX protocol is a standardized communication protocol. It is used to control stage lighting devices such as dimmers, led lights, fog machines and intelligent moving lights or devices. This protocol is uni-directional, meaning it can only receive OR send messages, and never both simultaneously. You need a USB to DMX bridge to send or receive DMX. Modul8 supports the Enttec DMX USB pro (www.enttec.com). This bridge will serve as communications port to receive or send DMX messages to and from your computer. With this technology you can:
- Using a custom module, control DMX compatible stage devices from your computer within Modul8
- Control Modul8 using a light desk
The DMX protocol can control up to 512 channels per DMX controller.
DMX works like a network and employs a multi-drop bus topology with nodes strung together in what is commonly called a daisy chain. A network consists of a single DMX 512 controller. This network can have one or more slave devices, for instance multiple lights can be linked and have the same channel. Each slave device is driven by 8bit data, 256 values between the range 0-255.
Each DMX network is called a ”DMX universe”. Modul8 version 2.6 can control only one universe (universe #0), but in future releases you will be able to add more universes.
39. How to get a DMX message
Before you start to write a single word of code, plug the USB to DMX device into the computer. Ensure that Modul8 is not running when you plug or unplug the Enttec DMX USB Pro.
Launch Modul8 and open the preferences window (⌘,) and select the “DMX” tab. Select the the ENTTEC DMX USB Pro from the list.
A sub list appears. Select the controller you will use with Modul8. If you have more than one controller, choose the required controller from the list. Then ensure that ”Receive mode” is checked and click on the ”OK” button.
To check if the computer is communicating you can open the Modul8 information window. Go to “Modul8” > “Info” or use the shortcut (⌘ ⌥ I) and click on the “DMX” tab. This step is optional.
Go to the script editor and select the “DirectEvent(type,param)” script event block. When a DMX message is received, the type of message is 'DMX'. The message returns a dictionary with the DMX data information. It returns the following structure dictionary:
{'universe': 0, 'value': integer, 'channel': value, 'timestamp': float}
The 'universe' key is always 0. The 'value' key is an integer from 0 to 255, the 'channel' key returns an integer from 1 to 512 and the 'timestamp' key returns a float number that describes the elapsed time since Modul8 was launched.
For example, to parse values from channel 5 and convert it to a float number from 0.0 to 1.0, type in:
if type == 'DMX':
	if param['channel'] == 5:
		print param['value']/255.0
40. How to send a DMX message
To send a DMX message, you must ensure that your DMX controller is set to ”Send mode” from the DMX panel in the Modul8 preferences (⌘,).
In the script editor, use the “sendDMX()” function to send a DMX value to a channel. The “sendDMX()” function structure is:
modul8.sendDMX(universe, channel, dmxValue)Use “0” as universe value. For instance, to send the value 205 to channel 3, type in:
modul8.sendDMX(0, 3, 205)
8 bit vs. 16 bit
DMX does not mandate a method of 16 bit encoding. However, many moving lights make use of an encoding larger than 8 bit numbers. To control position more accurately some fixtures use two channels each for pan and tilt. This gives a 16 bit value range of 65536, permitting accuracies for each axis down to 0.007° (446°/65536)
- 1 channel = 256 values (0-255) = 8 bit
- 2 channels = 16 bit = 256*256 = 65536
You can break a 16 bit number into two 8 bit values: a high bit value, and a low bit value.
If “val” is a 16 bit number, then the returned lowBit and highBit will be:
highBit = int(val/256)
lowBit = val%256
To create a 16 bit number from two 8 bit DMX channels:
sxtnBitValue = highBit*256+lowBit41.How to control module versions
If you use keywords that are only available from a specific version, you can prevent the module from running and stop it by checking the running version of Modul8.
In the first line of the “Init()” script, type:
version = 2.6 #version check
if modul8.getValue('direct_version', 0) < version : module.stop()
The “module.stop()” function stops the current module.
42.How to Send or get OSC Messages
With Modul8 2.9 you can send and get OSC Message natively. OSC setup is done via the Modul8|Preferences...|OSC dialog.
OSC input is announced via Bonjour for use by TouchOSC , Vezér and other apps .
Get OSC messages (input)
-
open the DirecEvent(type,param) script type:
type == 'OSC'

#when OSC message is returned the param object contains :
#address: OSC address of the message
#args: a list of arguments
#timestamp: time when OSC message was received
Send OSC messages (output)
#you can send different osc messages, single or multiple values
modul8.sendOSC("/yourmessage", 4.1)
modul8.sendOSC("/yourmessage1", 1, 3.14159265, True, "test1", "deja")
modul8.sendOSC("/yourmessage2", (2, 2.2, True, "test2"))
modul8.sendOSC("/yourmessage3", [3, 14.15, False, "M_PI"])Essential Python (to create Modul8 module scripts)
This chapter is not a comprehensive documentation about Python scripting. It gives essential keys to start scripting with Python and describes essential Python scripts to create modules. Python is a powerful, high level programming language. It has a script interpreter and a library of functions to simplify operations and save time.
The official reference about python is http://www.python.org.
Variables and types
A variable is a reference that stores values and objects. It’s also a shortcut to access expression calculation. The language differentiates between different types of variables. Each type belongs to a family called ”Class”. A Class includes blueprints, attributes, functionalities and possibilities.
Types
Main types are
- Number: for performing calculations
- String: manages text
- Boolean: manages true or false
- List: a container where each element is managed by a numbered reference
- Dictionary: a container where each element is managed by a keyword
- Function: a type defined by a list of actions
To define a variable you must link a reference name to a value. The reference name is a word that will be used to define the value. The value can be a number, a string, a boolean, a list, a dictionary, etc. The link between the name and the value is the ”=” operator. You can use it to set the value of a variable:
myText = 'text'
myInt = 10
myFloat = 5.05
myList = ['a','b',11,12]
myDict = {'key1':150,'key2':'value'}

#If you want to know the type of a variable, use the function ”type”:

print type(myText) #returns <type 'str'>
print type(myInt) #returns <type 'int'>
print type(myFloat) #returns <type 'float'>
print type(myList) #returns <type 'list'>
print type(myDict) #returns <type 'dict'>If you have a series of variables to assign, such as position (x,y,z) or color (r,g,b,a), you can define them in a single line with a sequence order. For example, you can assign the x,y,z values to three different values.
Instead of:
x = 1
y = 0.5
z = 0.3
print 'x:', x, ' y:', y, ' z:', z
#prints out x: 1 y: 0.5 z: 0.3
You can write a sequence of variables with a sequence of value assignments:
x, y, z = 1, 0.5 , 0.3
print 'x:', x, ' y:', y, ' z:', z
#prints out x: 1 y: 0.5 z: 0.3
And if you want to assign the same value to variables, link all variables with the equal sign:
x = y = z = 1
print x, y, z
#prints out 1 1 1
When you want to ask the script for a comparison, use the double ”==”. For example, to ask if “myText” is equal to “'text'”, call:
print myText == 'text'
#prints True
Numbers
There are different categories of numbers, integers and float numbers. Integers have no decimal number. This kind of number does not display decimals even if the result of an operation has a decimal. For example:
5/2 will return 2
A float number is a number with decimals. Even if the result of a calculation has no decimal, it will display the decimal. For example:
10.0/2.0 will return 5.0
If you calculate an integer and a float number, the result will be a float number. For example:
10/2.0 or 10.0/2 will return 5.0
A float number’s decimal is defined by a point ”.” - not a comma ”,”. “1,5” is wrong, “1.5” is correct.
int()
You can force a number or the result of an operation to be transformed into a float number or integer.
To transform a float into a integer, use the function “int(value)”. You can transform a float number into integer and transform a text string into integer:
int(3.5) will return 3
int('10') will return the number 10. The “int()” function interpreted the string '10' ten as a number. For example, to add ' 6' to 4 if you call:
print '6'+4 will print an error : TypeError: cannot concatenate 'str' and 'int' objects
Whereas print int('6')+4 will print out 10
float()
The equivalent function to transform numbers and expressions to float number is the “float()” function:
float(10) will return 10.0
float (5/2) will return 2.5
float('10.65') will return 10.65
The interpreter can understand '10' as the number 10 with the “float()” or “int()” function. The interpreter won’t be able to interpret the word ”ten” “float('ten')” or “int('ten')”. When you convert a string into float, ensure to use a point as a decimal separator. Don’t use comma.
abs()
The “abs()” function transforms a number to get the absolute value of a number. It’s useful when you want to calculate an absolute distance or when you work with trigonometric functions.
abs(-5) returns 5
Number operations
Many mathematical operations can be performed with built-in functions and operators. The main operators are
| Operation | Math sign | Python operator | Example | |
| addition | + | + | x+y | print 2+3 #5 |
| subtraction | - | - | x-y | print 3-2 #1 |
| multiplication | x | * | x*y | print 3*2 #6 |
| division | ÷ | / | x/y | print 6/3 #2 |
| truncating division | ÷ | // | x//y | print 5//2 #2 |
| modulo | % | % | x%y | print 6%2 #0 |
| power | xn | ** | x**y | print 2**3 #8 |
All numeric operators can be also used in variable incrementation operations. For instance, if you want to add a number to an existing variable you have two different ways to write it. The extended way:
x = x + y
Or the compact way:
x += y
Incrementation can be done with all number operators:
| Operation | Extended | Short |
| addition | x = x+y | x += y |
| subtraction | x = x-y | x -= y |
| multiplication | x = x*y | x *= y |
| division | x = x/y | x /= y |
| truncating division | x = x//y | x //= y |
| modulo | x = x%y | x %= y |
| power | x = x**y | x **= y |
String
Text strings are defined by a text sign container. Strings can be defined by ' (quotes) or " (double quotes).
For instance the sentence ”Hello, world” can be written:
But you cannot open a string with a single quote and close it with a double quote : 'Hello" or "Hello' is incorrect.
Strings are also interpreted as a list of single text strings when you perform string extraction operations.
If you need to add escape characters like tab or newline, the conventional notation won’t be interpreted by the string interpreter. You will need to use special characters. These characters are associated with the backslash character.
| Description | Backslash notation |
| Tab | \t |
| New line | \n |
| Return | \r |
For instance, if you want to display ”Hello world” on one line and ”Modul8 is cool” on another line with a single string, you can write:
text = 'Hello\tworld\nModul8 is cool'
modul8.setValue('direct_layer_text_field', text, 0)
In this example, “\t” and “\n” are stuck to the rest of the string because if you add space characters for better readability, for instance 'Hello \t world \n Modul8 is cool', the output string will be wrong. There will be an additional space to the tab and the new line will start with a space (line characters won't be aligned).
Join/concatenate strings
To join strings use the ”+”. You can only concatenate a string with another string. If you use variables, ensure that its content is a text string.
text1 = "Hello"
text2 = ", World"
string = text1 + text2
print string
#prints out : Hello, World
Convert a number to a string
The “str()” function transforms a number or number expression to a text string.
str(50) converts 50 into '50'
The next example shows the string:
x = 50
text = str((x-20)/5.0)
print text # prints out '6.0'
print type(text) #prints out <type 'str'>
String slice/extract
A text string is like a list of single letters. Each letter has a position within the word. When you do a crossword puzzle game, each letter is linked to a position in a grid. Python uses a list operation to slice and extract letters and sub strings.

For example, the word ”Modul8” is a six letter word. It can be converted into a list of letters like ['m', 'o', 'd', 'u', 'l', '8']. This list of letters has an order for each letter :
'm' = index 0 , 'o' = index 1, 'd' = index 2, 'u' = index 3, 'l' = index 4, '8' = index 5.
To calculate the number of letters/the length of the string, use the “len(string)” function:
st = 'Modul8'
print len(st) #returns 6
When you want to select a letter from a string, point at its index letter. For instance, to select the letter ”d” in the word ”Modul8”, the index to point at is number 2. Use [] (brackets, the list function) to extract the letter from the desired position:
st = 'Modul8'
print st[2]
#returns 'd'
print st[0]+st[1]+st[2]+st[3]+st[4]+st[5]
#returns 'Modul8'
Now, to extract more than a single character, the “:” sign (colon) will do the job. This sign extracts elements from a list by slicing them from it. Regarding the position of the colon within the statement, it can extract characters before or after the slice index.
From the previous example, to get all characters from (and including) the letter ”d” (index 2) in the word ”Modul8”, place the colon sign after the slice index like this: “[sliceIndex:]”.
print st[2:]
#returns 'dul8'
To get all characters before the slice index, put the colon sign before the slice index: “[:sliceIndex]”.
print st[:2]
#returns 'mo'
Most of the time when you slice a string, you need to extract only a portion of the string. For example, get the first 3 letters or a string. To get only a portion, use the statement “[fromIndex:toIndex]”. In other words, this statement means ”From this character index, extract characters to this index.” From the previous example, to extract the first 3 letters of the word ”Modul8”:
print st[0:3]
#returns 'mod'
To extract ”dul” from ”Modul8”, the start index letter is ”d”, index: 2, and the end index is ”l”, index: 4.
print st[2:5]
#returns 'dul'If you don’t want to calculate a destination string index when you extract an x number of characters, use the following formula:
extract = [start index : (number of strings to extract+1)]When you create dynamic modules, it’s very handy to use a module name root and then only get a number to make the difference between modules. Sometimes it’s easier to count from the last character of a text string.
For example, to get the last character of ”Modul8”, it’s possible to get it with a tricky slice script phrase like:
st[(len(st)-1)]. Not very glamourous, is it? An easier way to perform this operation is to count from the end.
Use minus numbers to count backwards. -1 is the last character :
print st[-1]
#returns '8'
Index -2 is the second character from the end.
print st[-2]
#returns 'l'

print st[-6]+st[-5]+st[-4]+st[-3]+st[-2]+st[-1]
#returns 'Modul8'
To slice a number of characters from the end, use the same slice character ”:” (colon). For example, to get only the last three characters of the string, type in:
print st[-3:]
#returns 'ul8'
To get every character but the two last characters, type in:
print st[:-2]
#returns 'modu'
startswith()/endswith() functions
“startwith()” and “endswith()” functions are string functions to check if a string starts or ends with a specific chain of characters. It can be very useful to identify the type of keyword in the “keywordEvent” script block. For instance if you want to do an operation when any background color component is changed, it’s easier to check if the keyword starts with 'ctrl_master_backgroundColor' than to do three condition checks for each background color change.
To check if a string starts with another string, point at the string reference and use the “startswith(stringtocheck)” function. “startswith()” returns a boolean.
string = 'ctrl_master_backgroundColorB'
print string.startswith('ctrl_master') #returns True
print string.startswith('ctrl_layer') #returns False
To check if the string ends with a specific character string, use the “endswith(stringtocheck)” function:
print string.endswith('ColorB') #returns True
print string.endswith('ColorR') #returns False
Boolean
Boolean is a type that allows for true or false statements. To set a variable or expression to true or false, use ”True” or “False”:
right = True
wrong = False
print right #prints out True
print wrong #prints out False
When you call a comparison statement, the result will be a boolean. For instance, if we ask if 1+1=2? Or 1+1=3?
print (1+1 == 2) #prints out True
print (1+1 == 3) #prints out False
The result of a comparison is type sensitive. For instance:
print (5/2 == 2) #prints out True
print (5/2.0 == 2.5) #prints out True
print (5/2.0 == 2) #prints out False
List
A list is a container. It can store any type of element. A list is an indexed object. Each element from the list has a unique number reference. This index sets the position of an element within the list. Thanks to this hierarchy a list object is a sort of sequence. Each index remains in the same order. This property order helps out to count, add elements at the beginning or at the end, and perform operations.
A list is defined by ”[]” (square brackets). Each element from a list is defined by a comma that orders its elements.
A list can contain a single type of element such as numbers:
[5, 6, 7, 8, 9] or strings:
['a', 'b', 'c']or dictionaries:
[{'prop': 'value'}, {'key': 'name'}]or even lists. This what we call a matrix:
[[1, 2], [2.5, 6], [10, 11]]or a mix of different types:
[1, 3, 'a', 'b', {'prop': 'value'}]You can create a blank list and add elements within scripts. To write a blank list use only square brackets with no content
mylist = []
print type(mylist) # returns <type 'list'>
Read
To read a list, point at its index number. Every element index from a list starts at 0.
For example, in this list of strings, to get the 'b' ['a',b','c '], use index 1.
list = ['a', 'b', 'c']
print list[1] #returns 'b'
list[0] -> 'a'
list[1] -> 'b'
list[2] -> 'c'¨
To write into an existing list, point at the list index and set the value:
list = ['a', 'b', 'c]
list[0] = 'hello'
print list
#prints out ['hello', 'b', 'c']
Be careful not to edit and add a value to an index that does not exist. For instance:
list = []
list[0] = 'hello'
Will return the folowing error: “IndexError: list assignment index out of range”
If you want to add an element to a blank list you can add blank entries or “None” values to the list:
list = [None, None, None] or list = ['', '', '', '']. This technique is fine when you have only a few blank values to initialize, but it can be a really time consuming process. In Python you can use the * (multiply) sign to multiply a script asset. For instance, if you want to print 20 times the sign “=“, type: “print '='*20”. It is the same for a list.
The multiply sign next to a list will copy the content of the list by the number next to the multiplier. For example,
list = [None for _ in range(5)] #will return [None, None, None, None, None]and then you can set the desired index value.
list[3] = 'hello'
print list #returns [None, None, None, 'hello', None]
You can also use this tip to initialize a list with default values. For example, if you want to initialize all values of an element list containing 10 entries, each with 0.5, you can type:
list = [0.5 for _ in range(10)]
print list # returns [0.5, 0.5, 0.5, 0.5, 0.5, 0.5, 0.5, 0.5, 0.5, 0.5]
Finally, it’s very useful when you want to initialize a matrix or list of dictionaries:
list = [['x', 'y'] for _ in range(4)]
print list # returns [['x', 'y'], ['x', 'y'], ['x', 'y'], ['x', 'y']]
list = [{'key1':'value1', 'key2':'value2'} for _ in range(4)]
print list # returns [{'key2': 'value2', 'key1': 'value1'}, {'key2': 'value2', 'key1': 'value1'}, {'key2': 'value2', 'key1': 'value1'}, {'key2': 'value2', 'key1': 'value1'}]Add an element to a list with append()
To add an element to the end of a list, use the “append()” function. For instance, to add 'c' to the list ['a', 'b'] , type:
list = ['a', 'b']
list.append('c')
print list # prints out ['a', 'b', 'c']
List count
To count elements of a list, use the function “len()”. It will return the number of elements in the list. This function is read only. For instance to know the length of ['a', 'b', 'c'], type in:
print len(['a', 'b', 'c'])
#prints out 3
Find and remove an element from a list
If you don’t know the index of an element of a list, you can remove it with the list function “.remove(search)”. This function will remove the searched element value.
list = ['a', 'b', 'c']
list.remove('b')
print list
#prints out ['a', 'c']
If you have the same value more then once, the “remove()” function will only remove the first found element. For example, the next script shows a list with several instances of “5”:
l2 = [3, 5, 4, 5]
l2.remove(5)
print l2
#prints out [3, 4, 5]
Delete list
If you want to delete a list object (or any object) use the “del” function. The “del” function deletes any object or variable. In this case the whole list object will be deleted, not only its content.
list = ['a', 'b', 'c']
del list
print list
This returns an error: “NameError: name 'undefined' is not defined. The object no longer exists.”
If you want to delete only one element from the list, use the “del” function to the desired list index. For example to delete 'a' , you will select index “0”. To delete 'c', select index “2”.
list = ['a', 'b', 'c', 'd']
del list[0] #delete index 0 --> 'a'
print list
#prints out ['b', 'c', 'd']
Dictionary
A dictionary is a useful object to store elements and access stored elements with an text reference.
A dictionary stores elements with a keyword indexation. A keyword is a string of text. A dictionary object is defined by curly braces {}. Unlike lists, a dictionary has no real hierarchy. It only has a pseudo-hierarchy, which is done by an alphabetic sorting order. Since you can access any element from a dictionary with its reference, it is no longer relevant in which order the contents of a list are.
A dictionary can contain numbers, strings, lists, dictionaries and tuples. Here are a couple of dictionary content types:
{'keyword': 'string value'}
{'keyword': 15.0}
{'keyword': [1,2,3]}
{'keyword': {'key': value}}
A dictionary can contain multiple elements. Each element of the dictionary is separated with a ”,” (comma).
{'key1': value1,'key2': value2,'key3': value3}Each element is built with a couple of assets: the keyword (also called key) and the value. A colon sets up the relationship between the key and its content.
To read a dictionary, type in the keyword you want to read within square brackets:
dict = { 'x': 5.0 , 'y': 10.0 , 'z': 20.0 }
print dict['z'] #returns 20.0
print dict['x'] #returns 5.0
print dict['y'] #returns 10.0
To write or add a value to a dictionary, point at the keyword reference name or create the keyword name and then add a value to it:
dict = {} # blank dictionary
dict['key'] = 'text'
dict['anotherKey'] = 22
print dict
#returns {'anotherKey': 22, 'key': 'text'}If you need to store a lot of keys or if you don’t want to identify keywords from values very quickly, use text captions for your keywords. {'KEYWORD': value,'KEY': value, 'NAME': value,'TYPE': value}
Dictionary has_key() function
If you want to check if a keyword exists within a dictionary you can use the “has_key('key')” function. To use this function, point to the dictionary and insert the searched key string within the “has_key()” brackets. The function will return a boolean.
dict = { 'X': 5.0 , 'Y': 10.0}
print dict.has_key('X') #returns True
print dict.has_key('NAME') #returns False
Function
A function is a reference that defines actions to execute. A function is defined by the keyword “def”. To define a function you have to name it. Since a function is a reference you have to give a name to your actions’s shortcut. Type your function name between the “def” keyword and brackets.
def displayMessage():
	print 'HelloWorld'
The function above is defined by the name “displayMessage” and prints out a text string as an action.
A function definition name must not begin with a capital letter. You can’t use spaces or special characters like accents to define a function. Try to use verbs to define actions and try to simplify and select meaningful names. For instance, if your function saves parameters don’t write write a name like:
def sp(): as it would be too short. You should also avoid naming functions:
coolfunction()... because it would be very difficult to determine what it does later on when you need to read through your code.
Use a meaningful action name like “saveParameters()”. If you want to make it shorter use something like “saveParam()” or just “save()”. Especially if it’s the only process you have for saving within your script.
If you want to use long function names it is advisable to separate words with capital letters so the name will be easier to read. For instance:
functionThatSavesParameters():A function’s action is always defined within an indented space container. For example, if you want to print ”Hello world” and then print ”======” you will need to indent these at the same position.
def displayMessage():
	print 'Hello world'
	print '='*6
Call/execute function
Once your function is defined you can call it anytime you need it. Just call the function name and add parentheses at the very end. For example, to call the “displayMessage” function, type in:
displayMessage()
#prints out
#Hello world
#=======
If you call it several times the function will execute several times. For example:
displayMessage()
displayMessage()
displayMessage()
... prints out
#Hello world
#=======
#Hello world
#=======
#Hello world
#=======
Function parameters
By default a function has no parameters. A parameter for a function is an option. For instance, if you want to display a dynamic message like ”Paul says: Hello world” or ”Jane says: Hello word” you need to put the name of the speaker in the parameter. The parameter is placed within brackets. It’s a variable name used locally inside the function. For example, to add the speaker in “displayMessage” function you can type in:
def displayMessage(speaker):
	print speaker,' says Hello'
The speaker is now set as a parameter. To call the function you now need to add the speaker’s name to the function call. Replace the variable name by the desired value:
displayMessage('peter')
#displays peter says Hello
If you have more than one parameter to set up your function, use comma to separate parameters. For example, if you have a function that changes the position of a layer, you will need the x position and y position:
def setLayerPosition(xpos, ypos):
	modul8.setValue('ctrl_layer_position_x', xpos, 0)
	modul8.setValue('ctrl_layer_position_y', ypos, 0)
To call the multiple parameters function it is imperative to respect the order of the parameters when you write the function calling function. In the last example, first define the x position then the y position. To set the position to x=50 and y=30, type in:
setLayerPosition(50, 30)You can use functions to compute operations and return them as a result. For instance, if you want to create a simple sum function, use the return statement to return the result:
def addition(a, b):
	return a+b
When you call the function “addition(a, b)”, the function will return the result but won’t display it:
addition(2, 3) # computes 2+3 but displays nothingIf you want to display the result you have to print out the function call’s result:
print addition(2, 3) #displays 5It’s very useful when you perform complex operations on strings, objects or numbers because you can assign the returned operation to a variable:
num = addition(3,3)
	print num
	# displays 6
Loops
The for loop statement can browse through an object. It can be a list or a dictionary.
for variable in object:
	doSomething
When you want to loop through numbers and want to perform a transformation related to a sequence of numbers, you will use a numbered sequence list with the “range()” function. For example, to print a series of numbers, write:
for i in range(5):
	print 'i = ', i
This script will browse a range of numbers in the object and return ...
i = 0
i = 1
i = 2
i = 3
i = 4
The “i” variable in the loop is a local variable. This means that this variable exists only within the process. You can use any variable name as a browser variable name.
The “for” loop can also browse an existing object:
list = ['a', 'b', 'c']
for item in list:
	print item
Returns
a
b
c
... or, to read a dictionary, use ...
dict = {'key1': 'value1', 'key2': 'value2'}
for key in dict:
	print key , dict[key]
... and this will return:
key2 value2
key1 value1
Loop though list with enumerate()
The “enumerate()” function is a very handy function that helps you browse all items and retrieve an index number of a list or sequence when you don’t know the number of elements.
list = ['a', 'b', 'c']
for i, item in enumerate(list):
	print i, item
The above returns the index of the list element “i” and its value:
0 a
1 b
2 c
Loop though dictionary with iteritems()
“dictionary.iteritems()” is another very handy function when you browse a dictionary. This function helps you retrieve the key and its corresponding value.
dict = {'keyword1': 'value 1', 'keyword2': ' value 2'}
for key,val in dict.iteritems():
	print key , val
The above returns:
keyword2 value 2
keyword1 value 1
Compare values
To compare two values, values must be comparable. You can only compare elements from the same type. You can’t compare a text string with a math operation. For instance, you can’t write 'text'== 12.
The basic comparison phrase is built with two equal signs: A==B means “is A equal to B?” The result will be a boolean answer that will return either “True” or “False”. This comparison phrase is called an expression. If you want to perform an action and the expected result is true or false, you have to write it with a script phrase that begins with ”if”. The question is written between the ”if” and the ”:” (colon). If the result of an expression is true, then the script can read the content of the attached script option.
We can summarize the process with this scheme:
Phrase is true:
-----> ----> Answer
This script condition will be translated into this structure
if condition :
	doSomething
If you want to compare the size of two numbers, you can write:
if 1 > 2:
	print 'yes, 1 is greater than 2'
#prints out yes, 1 is greater than 2'
A condition phrase can be built from different basic operators to compare:
- Strict equality: A == B
- Is the same as: A is B
- Is different from (is not the same as): A not B
- Is not equal to: A != B
- Is greater than: A > B
- Is smaller than: A < B
- Is greater or equal to: A >= B
- Is smaller or equal to: A <= B
Compare multiple values/expressions
You can create a complex phrase with a comparison of multiple values or multiple expressions.
An expression is a phrase made of script. It can contain operations or comparisons. For instance, “(1+1)” is an expression based on the calculation of two numbers. This expression returns the number “2”, but you can write a question as an expression like “(1+1==0)”. The result of this expression is “False”.
When you have more than one operation or expression to compare, you need operators to build these phrases.
A complex phrase can be ”if A is greater than B and B is equal to C, then …” Another complex phrase can be ”if A or B or C is smaller than D, then …”
Use the link word and to create questions with multiple elements. All elements must be required to validate the phrase. In the expression “(x>3 and y==2)”, if x is smaller than 3 or y is different from 2 the expression will return “False”. To summarize, the structure of the script is:
if expression1 and expression2:
	dosomething
Script sample:
if 1 < 2 and (1 + 1) == 2:
	print 'ok'
If only one expression of the phrase has to be true, use the or link word. For instance ”if A or B or C is equal to D then do something”.
if expression1 or expression 2:
	dosomething
Script sample:
if 1 > 3 or 4 > 3:
	print 'ok'
else/elif
When you want to add an alternative to a comparison you can use the ”else” statement. The ”else” statement is the last option. If you have many options, use the “elif” statement. Don’t forget to add a colon and the same incremented space used in the ”if” content line.
if expression:
	option1
else:
	option2
Script example:
if x > y:
	print 'x is greater than y'
else:
	print 'x is smaller than y'
In the last script there is a missing case: when x equals y. To add a second option, use ”elif”. This statement is followed by an expression. If the expression is true the script will read the option’s content.
if expression1:
	option1
elif expression2:
	option2
Script example
if x > y:
	print 'x is greater than y'
elif x == y:
	print 'x is equal to y'
Range
The “range()” function is very handy when you want to create a mathematical sequence. It generates a list of progressing numbers.
For instance, if you need to create a list of ten values from 0 to 9 :
range(10)
#will return the list [0, 1, 2, 3, 4, 5, 6, 7, 8, 9]
But if you need to start at a particular index and count - for example, to create a list of numbers from 1 to 5, you will use the “range(from,to)” function .
range(1, 6)
#will return [1, 2, 3, 4, 5]
You can also create a range with negative numbers. For instance, if you want to go from -5 to 5, write:
range(-5, 6)
#will return [-5, -4, -3, -2, -1, 0, 1, 2, 3, 4, 5]
Round
If you want to round a number use the “round()” function. For example,
print round(5.2) #returns 5.0
print round(5.56) #returns 6.0
You can round and truncate results into decimals. Add the number of decimals as the second parameter of the “round()” function. For instance:
print round(4.256532223, 2) #returns 4.26
print round(4.256532223, 1) #returns 4.3
Math package
Besides built-in common maths operations like addition, multiplication, division, modulo and power, there are other mathematical functions available inside the math class package like trigonometric functions (Sin, Cos), square roots and constant numbers like Pi. First of all, retrieve the functions from this class by importing them with this line:
import mathThe class import has to be done only once in the script initialization (recommended). Every function is located in an internal folder inside the math class. Point at the math class to open the virtual folder and call the required function.
Every math function from this class begins with “math”.
Pi ∏
Pi is a constant, not a function. Don’t use brackets to display π , write:
print math.pi
#returns 3.14159265359
Trigonometric functions
| function | Python script |
| Cosinus | math.cos(angle) |
| Sinus | math.sin(angle) |
| Tangent | math.tan(angle) |
| Arc Cosinus | math.acos(angle) |
| Arc Sinus | math.asin(angle) |
| Arc Tangent | math.atan(angle) |
Square root √
The square root of a number is also included in the math class. As an example, you can use the “math.sqrt()” function to calculate √4 :
math.sqrt(4)
#returns 2.0
Random numbers
Random numbers are not a built-in Python class. To get random functions you must import the random class to your script. This class contains every random definition and function:
import random
Here are a couple of useful methods from the random class.
If you want to create a random float number from 0.0 to one:
random.random()
#>> 0.0516488708984
If you want to position a layer in a random location (using a float), but within a specific range such as -100 and 100:
print random.uniform(-100, 100)
#>> 15.743669918803288
To select a random media from your media set you will need an “int”. The following example would provide the ability to select a random number between 1 to 128:
random.randint(1, 128)
#>> 31
If you require a randomly selected even number:
# 1 <= int < 128 (even only, coz step=2)
print random.randrange(1, 128, 2)
#>> 42
If you have an existing list and want to randomly choose an entry:
print random.choice([1, 2, 3, 5, 9])
#>> 2
To create a range of numbers in a list and shuffle these numbers:
# create a list of 52 numbers
cards = range(52)
#>> [0,1,2,...51]
random.shuffle(cards) # order is random now
print cards[:5] # get 5 cards from the shuffled cards list
#>> [8, 41, 36, 12, 3]